
Introduction
It's our opinion you get more bang for the buck with our DS100DLHV micro servo. In part because it meets MIL-STDs. But also because the finned alloy case cools better, bronze bushings in the plastic make it more durable, and 60% more torque expands the range of models in which it's practical to use micro servos.
Bottom line? Our micro servo is a heavy-duty, more rugged, alternative to the super popular Hitec HS-5085MG for demanding RC aircraft applications, which call for high precision control, more torque, and greater reliability.
Does this make it a no brainer? Yes, and for doubters . . . we think we can prove it!
TL;DR







Background
Presuming you're a show me kind of guy, here's the rest of the story. I have decades of experience with Hitec micro servos because I've always liked smaller models. Today, tiny UMX models are old hat, but in 1977 folks thought I had a loose screw for flying 2-channel aircraft powered by Cox TD .049 engines.
It's because 19g micros didn't exist, so models struggled with Kraft KPS-14 servos!
Geartrain
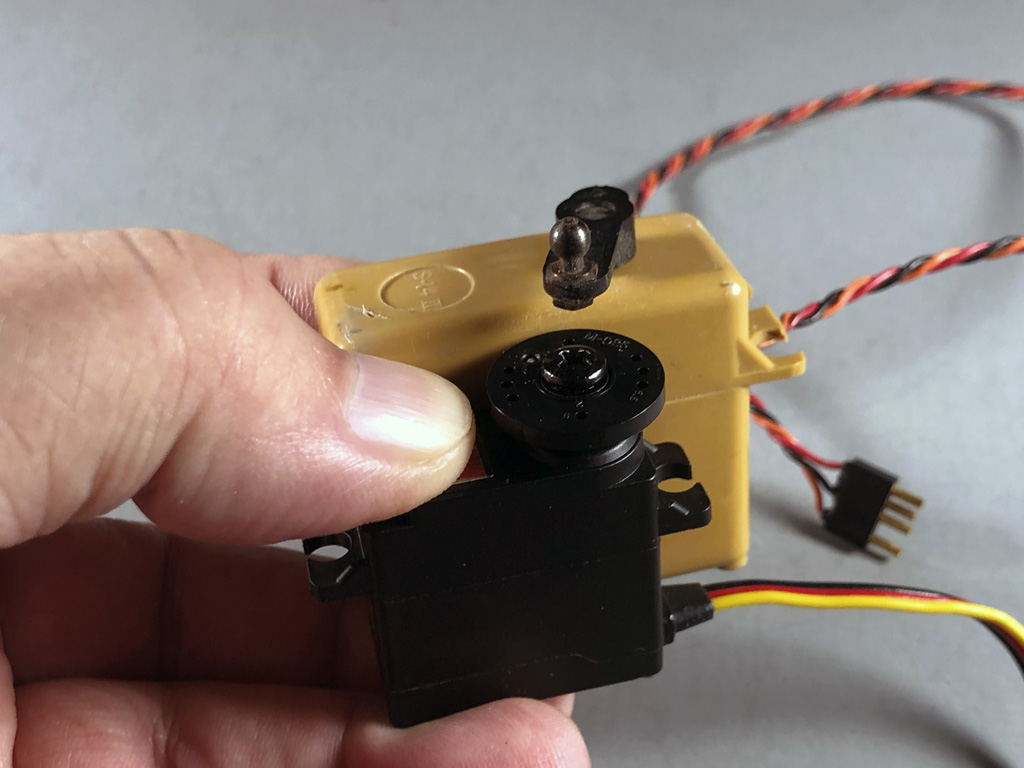
Upon encountering Hitec's HS-85BB Mighty Micro, I fell in love. And, because it's so tiny, I designed and built Snippit, a 4-channel model with a mere 28-inch wingspan! Predictably, an enlarged version powered by an OS MAX .15 followed, quickly leading me to discover the limits of Nylon gears.
Following an upgrade to metal gears, the HS-5085MG led me to switch and I never looked back. And, perhaps because I was using it with models larger than Hitec engineers envisioned, I soon discovered the limits of this servo, too. But now, instead of breaking plastic gears, it was the plastic case itself, which began to fail.
By fail meaning they developed excess play and wouldn't center. So, I'd trim the model and after a few maneuvers, it would go out of trim again. Seemed like I was trimming constantly. Grrrr!
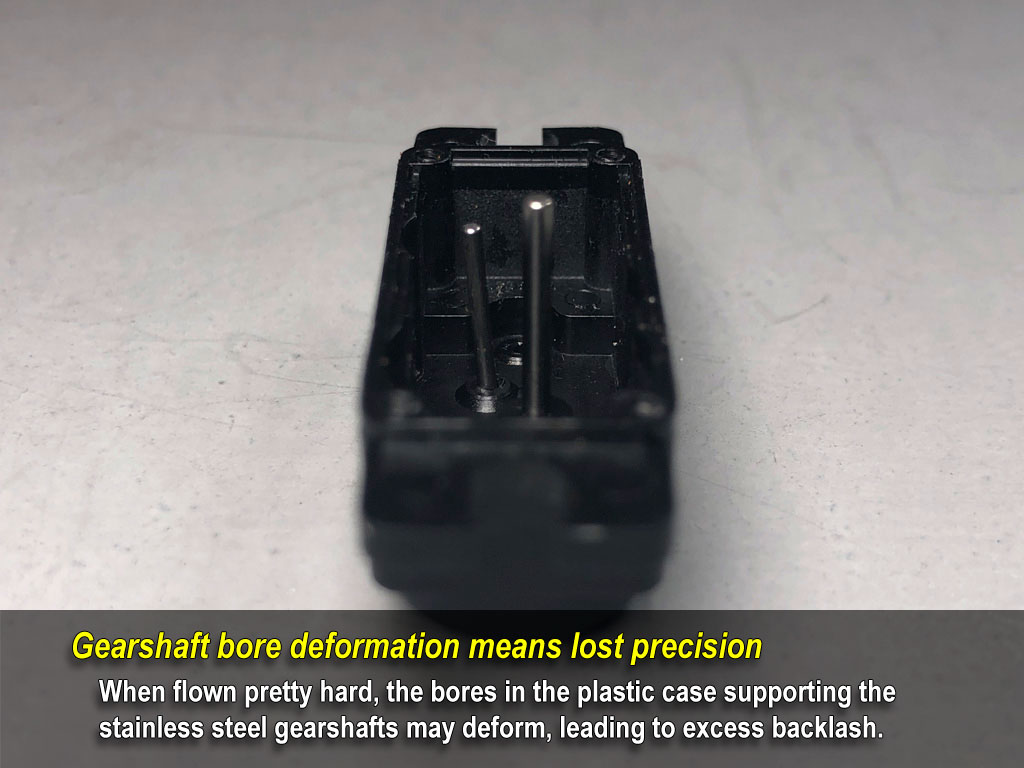
Curious to discover why, I'd take them apart to see what was happening and couldn't see anything obvious. Then, purely by chance, so I could closely examine the gears with a jeweler's loup, I set the shafts back into the bores so I wouldn't misplace them (they're tiny), and one immediately tilted slightly to the side.
That was the, Aha! moment.
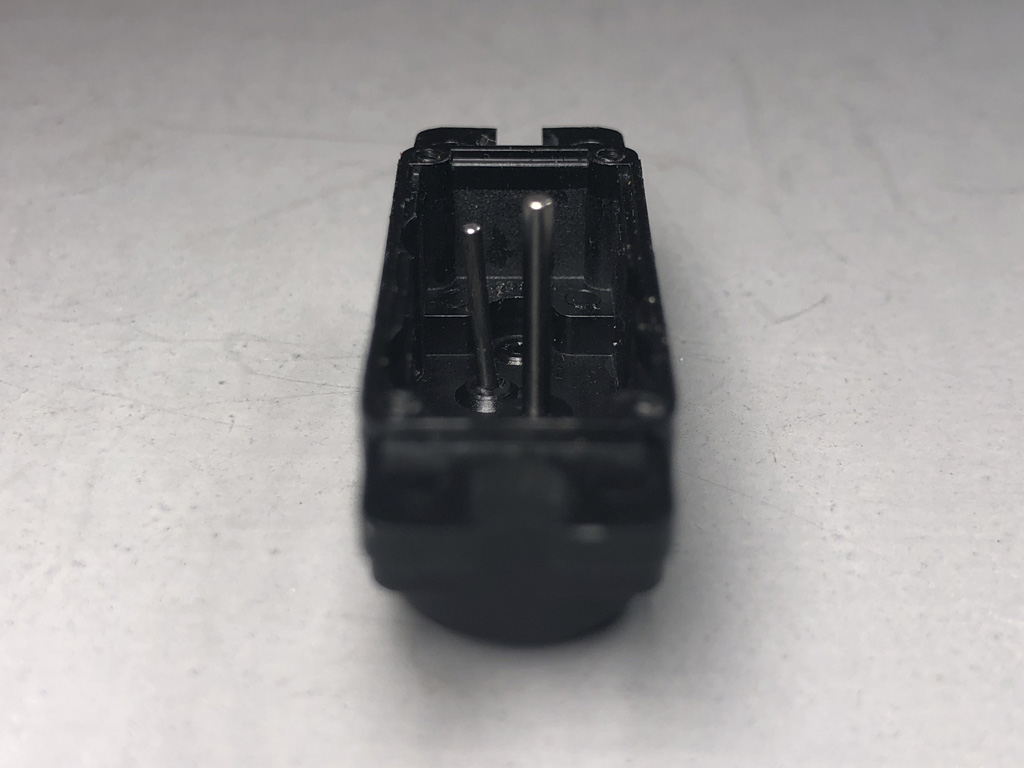
Note; in the above photo, the shaft's not bent, the plastic's been deformed.
Moreover, this makes perfect sense, too because the steel shaft is much harder than plastic! After all, the word plastic comes from the Greek plastikos, which means permanent deformation.
Thus, the failure chain goes something like this; once the gear shaft's position deviates from as-designed, precision goes out the window. Now the gears begin to suffer accelerated wear. And given time, this results in excess play, after which, servos no longer center.
Fortunately, the fix is easy, buy a new case and a new set of gears. Unfortunately, many do the math and toss the servo, instead. But another fix involves buying more durable servos to begin with - I know, what a concept!
So, due to long personal history with their product, I feel qualified to share my opinion of how Hitec micros, specifically the HS-5085MG, compare and contrast with our ProModeler DS100DLHV.
And make no mistake, I'm not saying theirs is a bad servo. Instead, I'm saying if you make high demands on your servos, perhaps with high value turbine models, fly high precision maneuvers typified by SPA pattern, slow-and-slow 3D, and especially the über hard and aggressive XA-maneuvers, then ours is your better alternative!
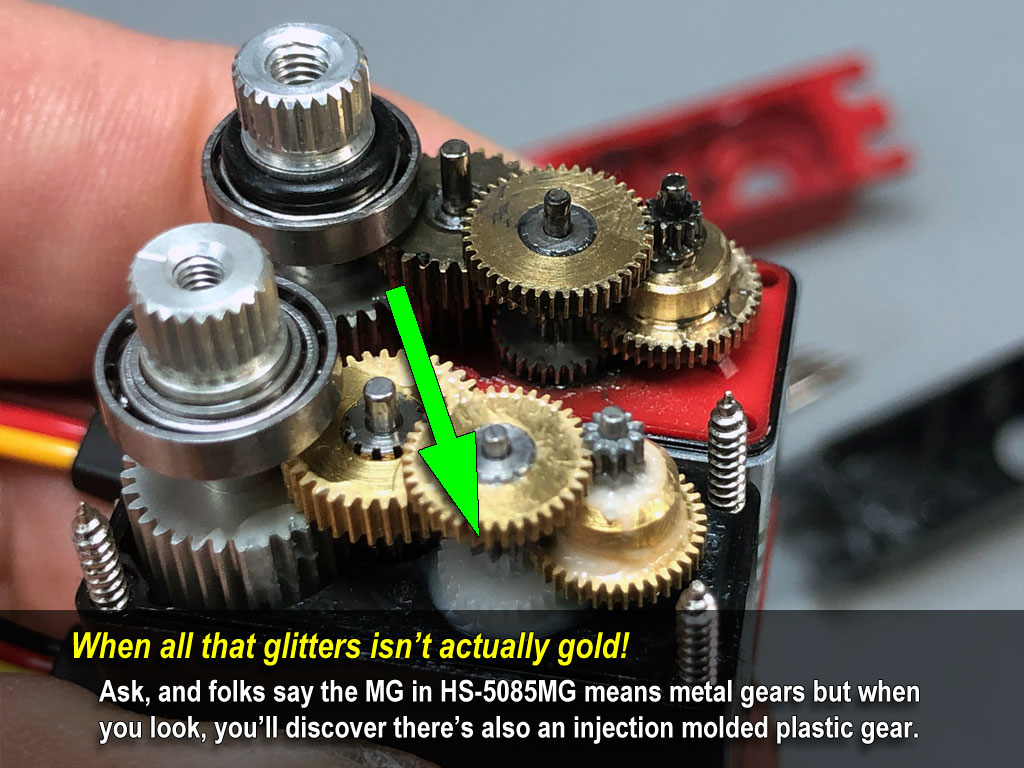
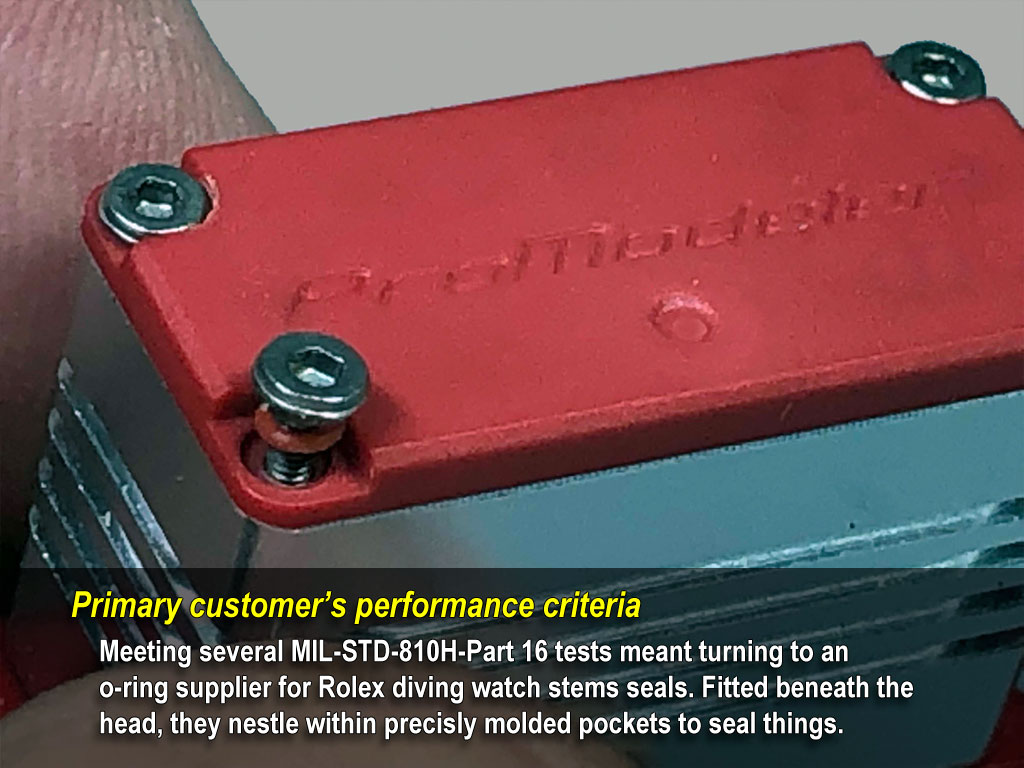
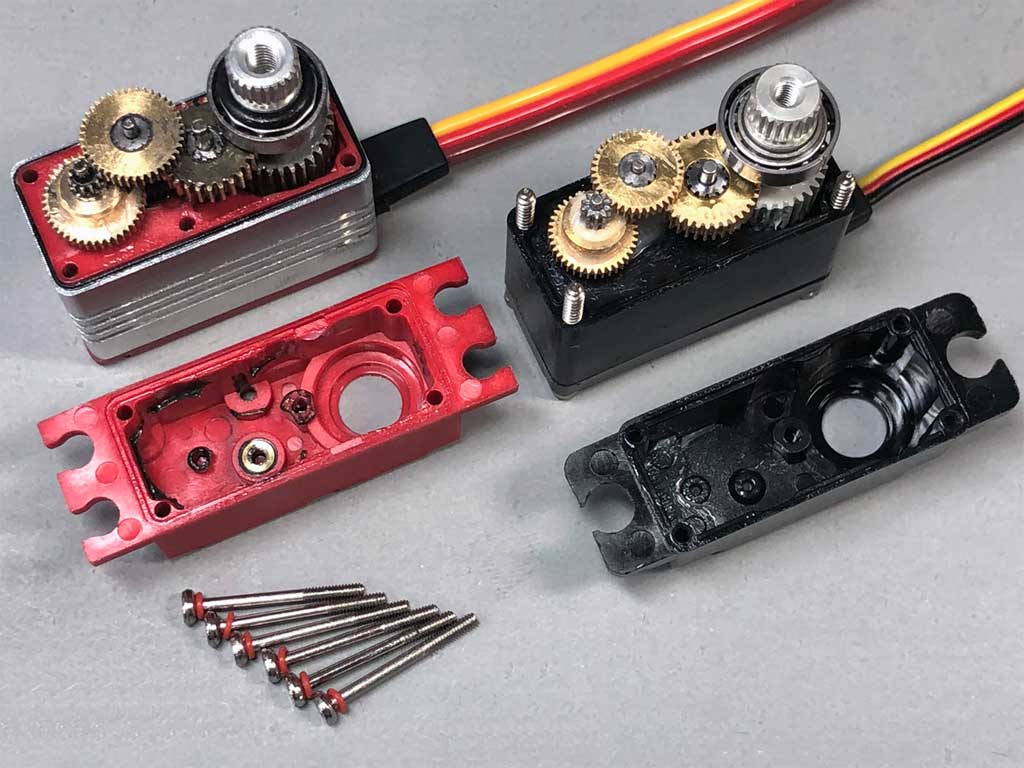
As we begin disassembly, this is the God's eye view of the gear trains. Eyeball the black o-ring setting on the bearing fitted to the output shaft of ours. Look more carefully, and you'll see a thin black o-ring at the case juncture immediately above the alloy center. There's another like it at the electronics cover. Add to these, 10 tiny o-rings beneath the screw heads. And all this to seal the DS100DLHV against environmental intrusion. But there's lots more to see!
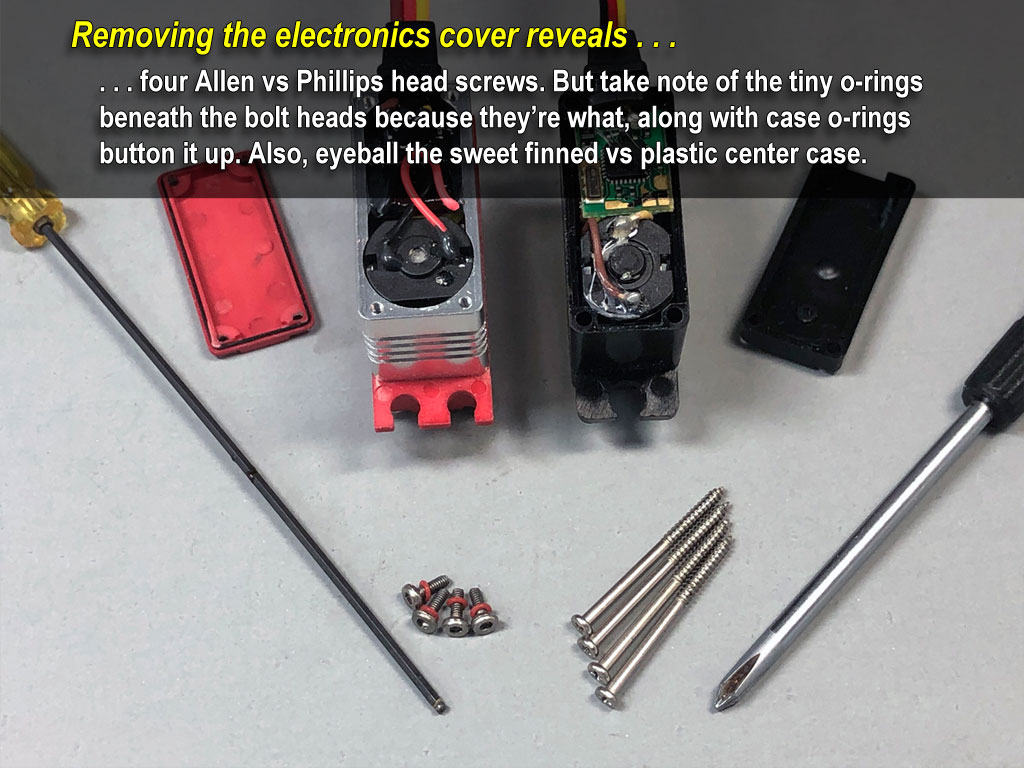
Next, ntice also the four coarse thread assembly screws used by Hitec for this product. They're so coarse, in my opinion, because they thread into the plastic upper case section. Ours use more finely machined threads because they thread into metal. Otherwise, the gear trains are remarkably similar.
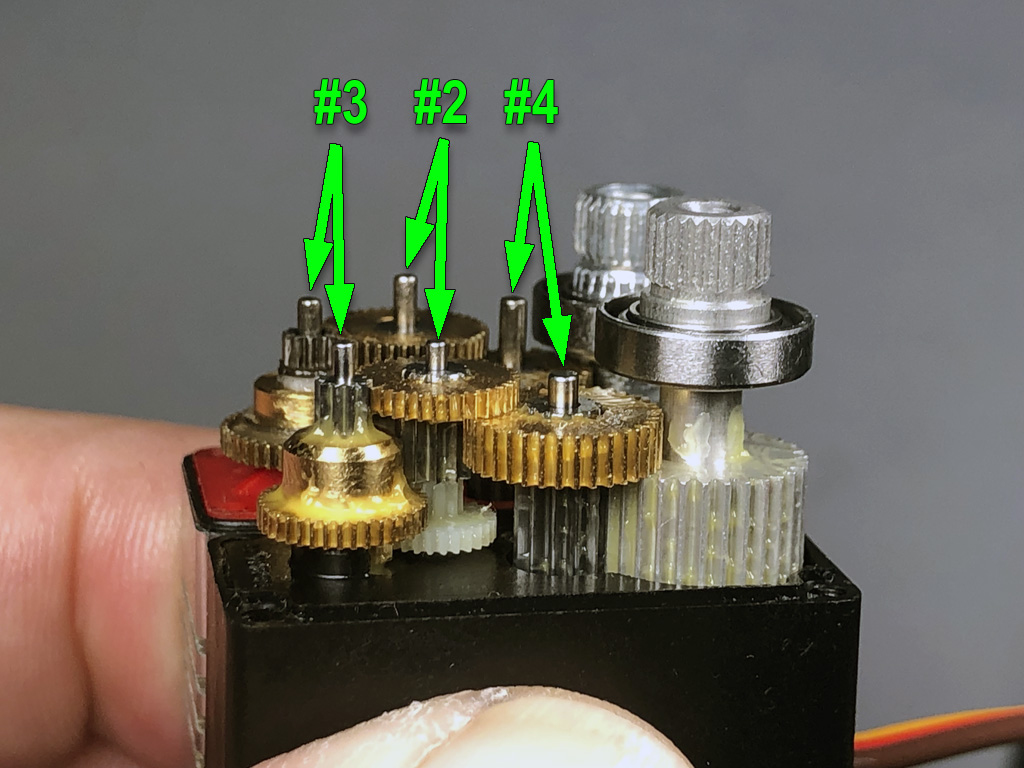
Now look closely at the exposed nubs of shafts 2, 3, and 4. They're numbered in the order they transfer the flow of torque from the motor to the final drive, which is the splined output shaft. Thus, the motor pinion is mounted on shaft #1, then in sequence, shafts #2, 3, 4, with the last shaft, #5 being the splined output.
Major point being, our shafts #2 and #3 are thicker, and shafts #2, and #4 both extend further (hence are better supported). What's important about the shafts being thicker and extending deeper into the case is this, because no part of the shaft is exposed when the gear train is assembled, then the further the numbs stick out the better.
Better because it means they're buried deeper into the case (same reason as when setting fence posts, deeper is better).
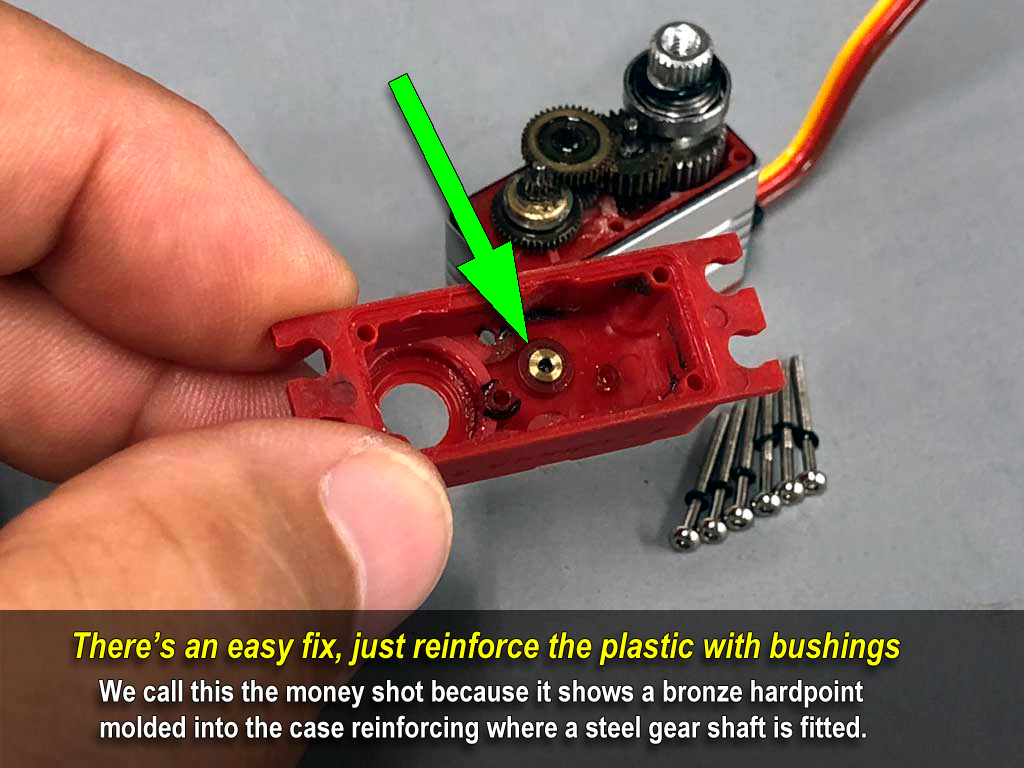
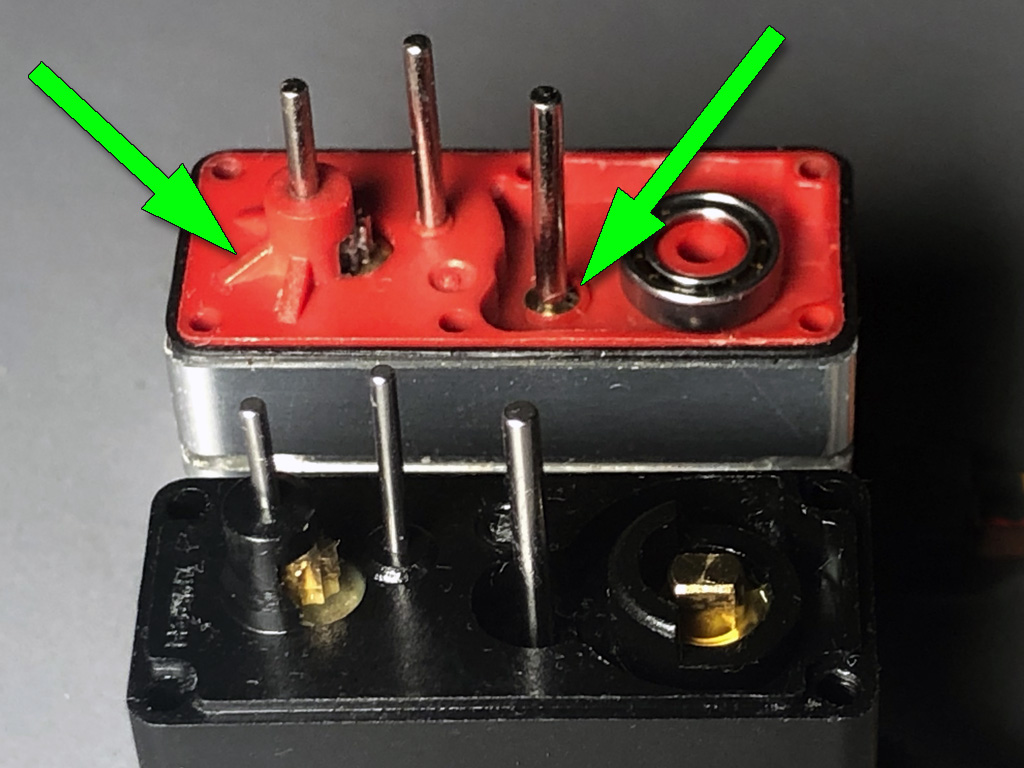
Next, following gear disassembly, take note of the bronze bushing, which is molded into the lower case of DS100DLHV. It serves a similar purpose to the one reinforcing the upper plastic case, but it's at the base of shaft #4 instead the top of shaft #3. But before explain further, there's another detail worthy of notice.
We've molded buttresses (webs) at the base of shaft #3. Added to which, cast your eye on the diameter itself of these shafts. For example, #3 is considerably greater in diameter compared to theirs. Ditto shaft #2 as well.
Recalling from middle school geometry, the surface area (A) of a cylinder with radius 'r' and height 'h' has the formula A = 2πrh + 2πr2 and if you ever sat in class wondering about the practical application, this is a perfect example!
Basically, the larger diameter shaft isn't just stronger, but because it also presents more surface area to the plastic, it's lowers the pressure loading exactly the same as more wing area gives you a better flying model.
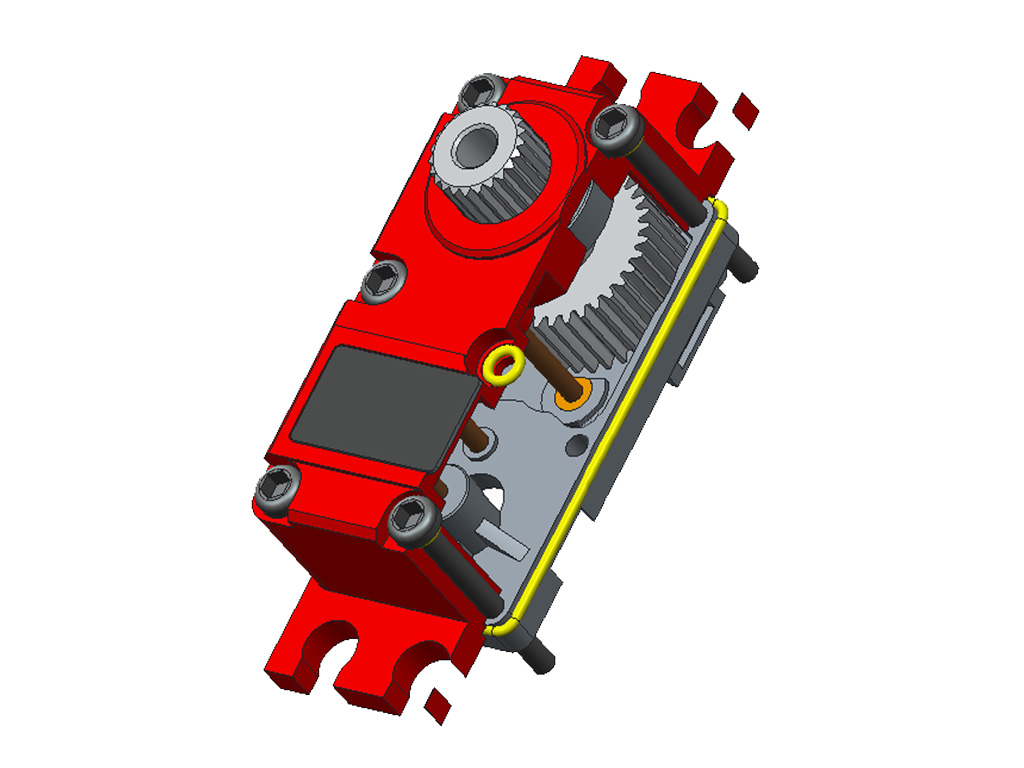
Circling back to the shafts, the way it works is the output shaft takes the brunt of the load being transferred from the flight controls back into the gears. Most happens at shaft #5, the splined output shaft with the servo arm. However, at shaft #4 the highest load happens down low where that combo gear drives the output gear. So we reinforce it there with bronze to better support it
Unfortunately, getting enough light into the lower part of the case sections is difficult, so next I'm sharing a render because it's easier to see the lower bronze insert than in a photo. It's the copper-color bushing positioned at the shaft nearest the output shaft gear.
But it gets worse for the Hitec because if you remember, the output shaft, #5 is the one taking the brunt of the loads. So the thing is, we support ours with two bearings. There's the one at the top located within the upper case. Then there's one at the bottom supporting the gear near the potentiometer. Unfortunately, Hitec elects to support the lower gear on a nub of plastic instead of a bearings. Honestly? Don't ask me why but lacking a bearing is part of the issue with these servos developing play so quickly.
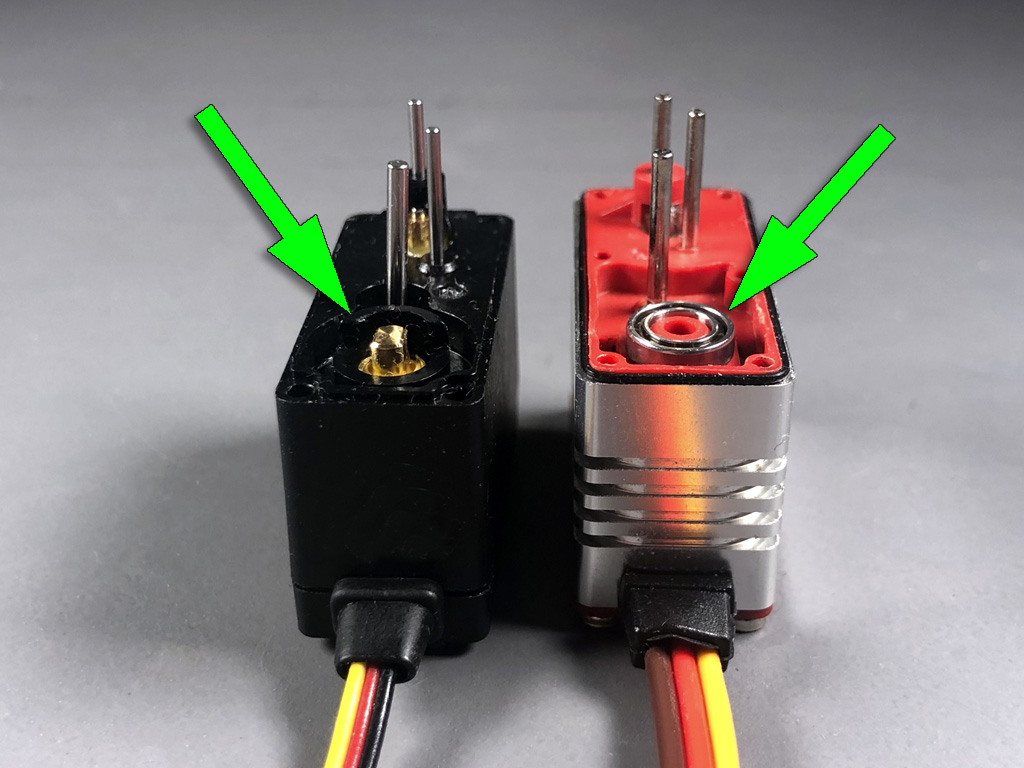
Recapping; two bearings instead of one, reinforcing the plastic case at two places instead of zero, and using larger diameter shafts extending further into the case for support, plus all metal versus a plastic gears are important factors for those seeking good value. But they are critically important for pilots who fly hard, or demand durability.
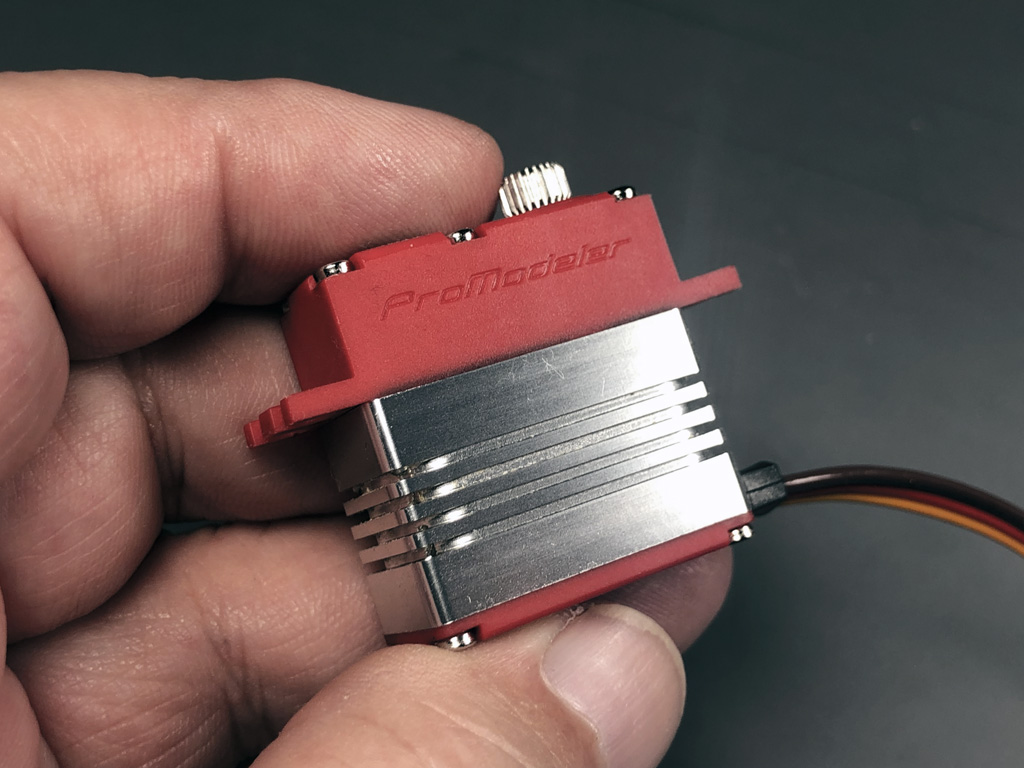
And all the above is why it's said a picture is worth a thousand words . . . but it's true only if you know what to look for. So, our approach will be photos + with the plus being an explanation of what to look for detail-wise within the photos.
Our thinking is, you don't need to be an engineer to judge whether something we do is better for you. All you need are a set of eyeballs and common sense!
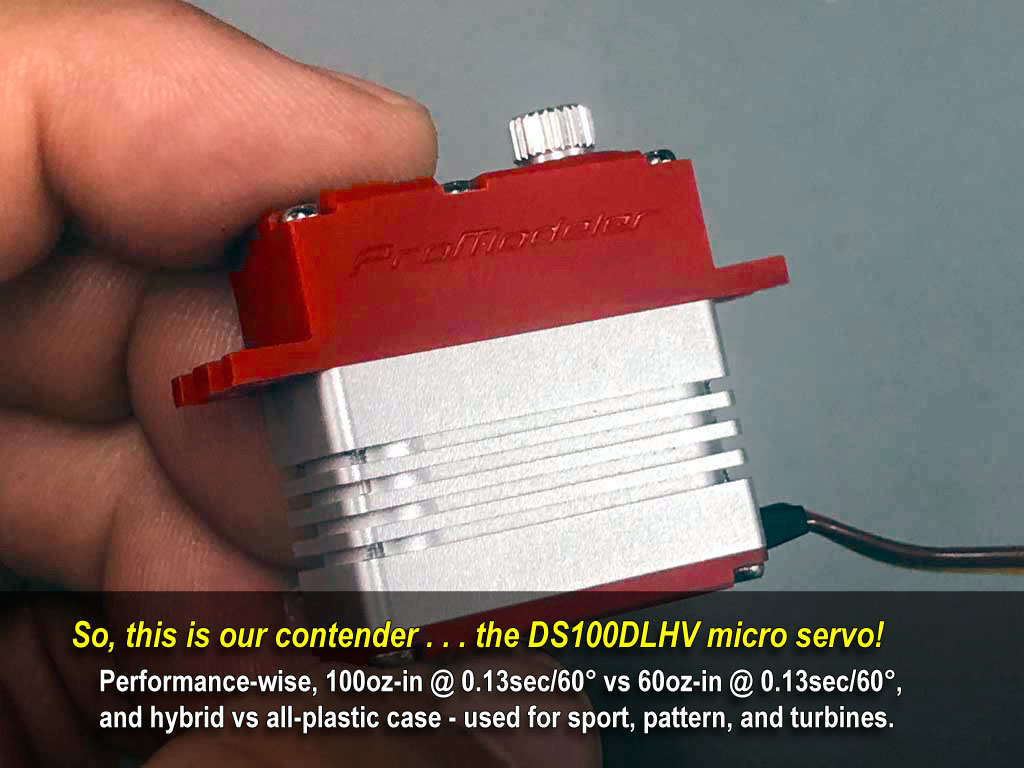
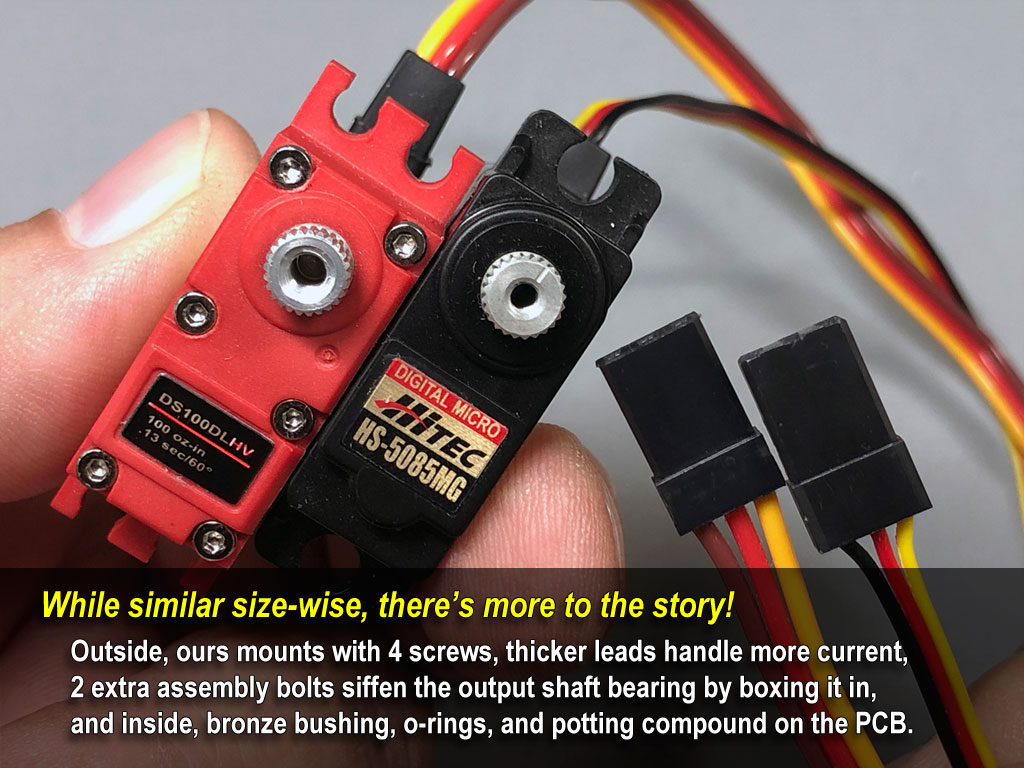
Before moving on, look again at the hero image at the beginning of the article. Take in the mounting flanges to spot the fact we mount the servo with 4 screws instead of 2. Also, the difference in the size of the threads for securing the servo arm (ours is M3 versus M2.5). Why?
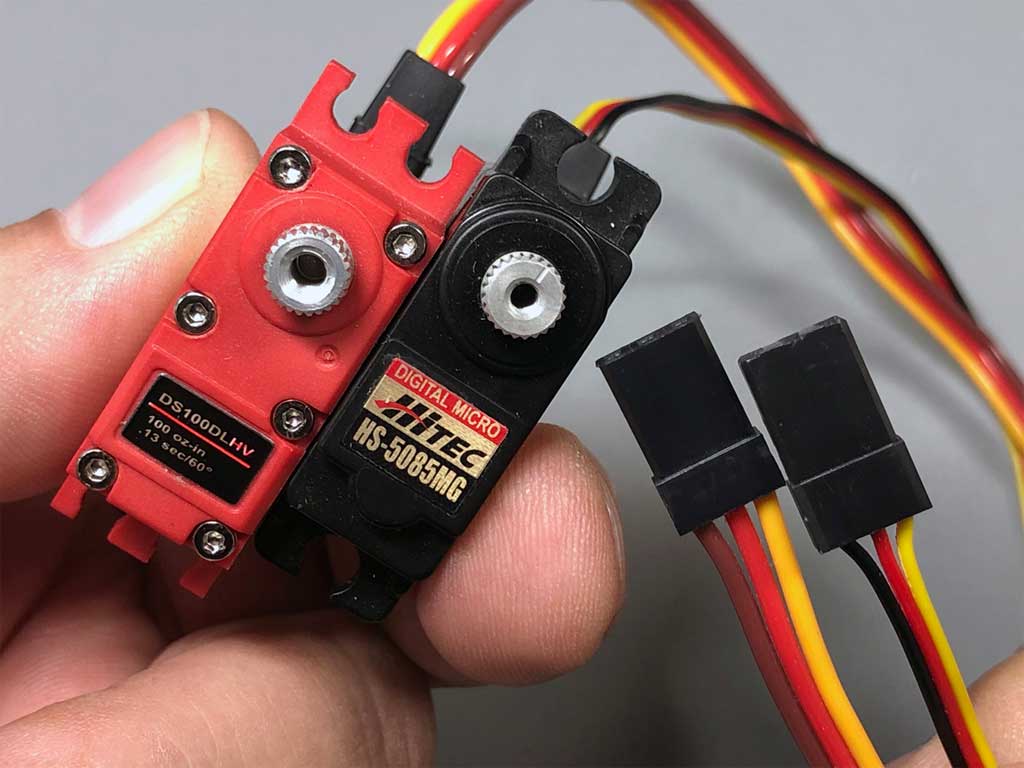
Well, using 4 instead of 2 mounting screws is because under heavy loads, the Hitec micro servos tend to rock side-to-side (unless they're rigidly mounted). This wasted motion translates in reduced precision. But if you eliminate the rubber isolators and hard mount the servo, which many guys tend to do, then the problem is, hard mounting is bad juju for servos due to vibration. Anyway, and as regards the M3 vs M2.5, it's nothing to do with being stronger but because M3 are usually easier to find locally if you misplace one.
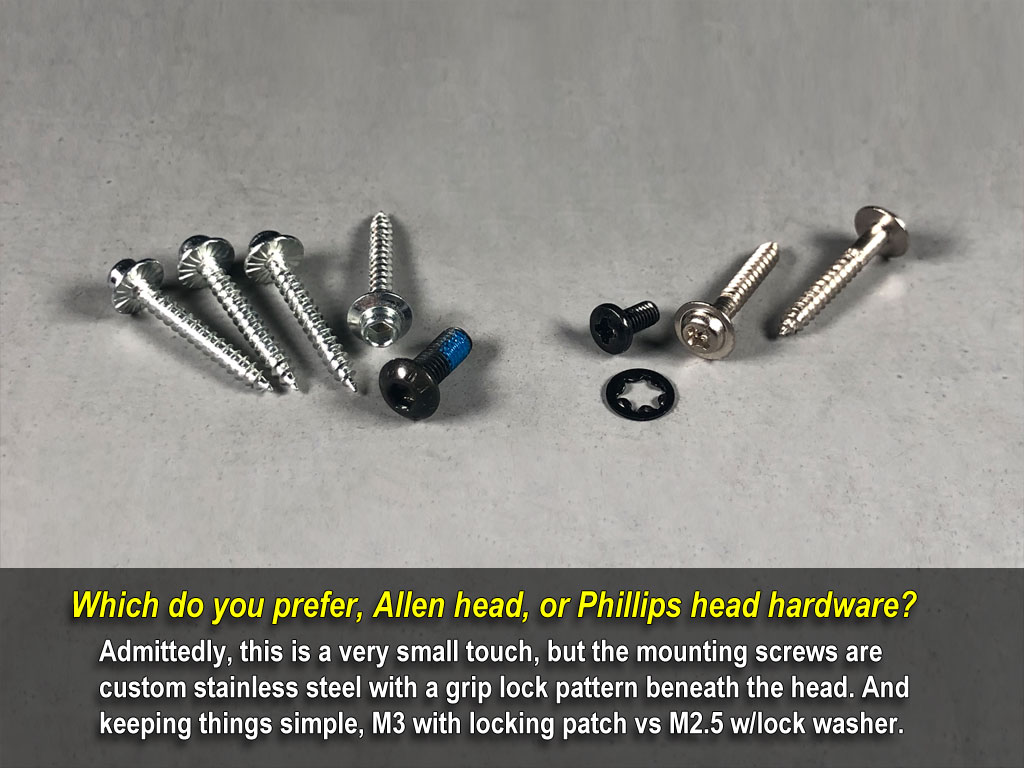
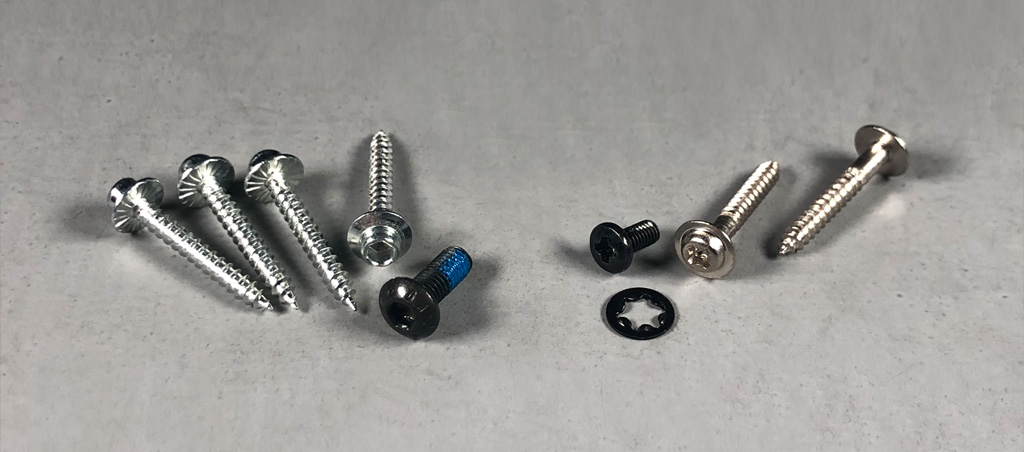
Lastly before moving on, and speaking to the screws themselves, you get the good ones with ProModeler. Like, the M3 is a button head Allen with a blue locking patch instead of Phillips with a lock washer. But also eyeball the four servo mounting screws; they're the very nice stainless steel Allen-drive instead of plated Phillips.
Is any of this a big deal? Not unless you're one for whom paying attention to the details is a good thing, then we done good!
Vibration isolation
Of course, your model, so do as you please in regards to hard-mounting, but to better protect your investment against vibration, like they do, we also include rubber grommets, brass eyelets, plus the nice aforementioned good mounting screws. it's just that you get four instead of two.
Doubt you need isolation mounts because you fly electric or turbines and everybody knows they don't vibrate? Think again! We have hard data proving that's not true.
Thus, our advice is always use the isolation mounts!
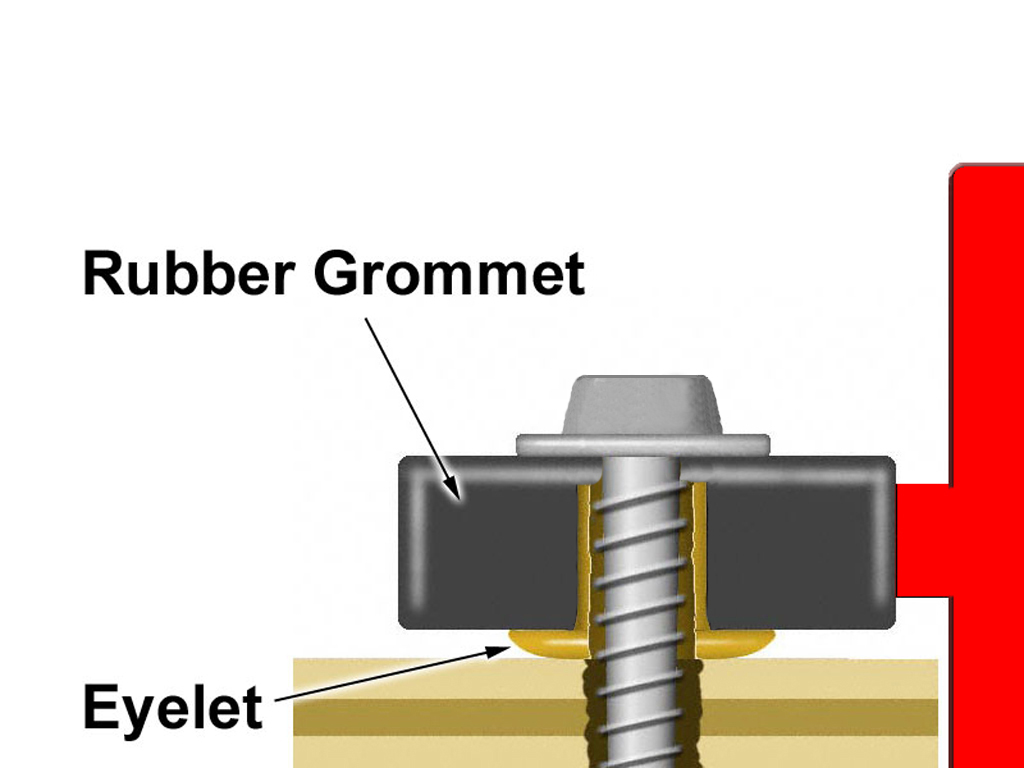
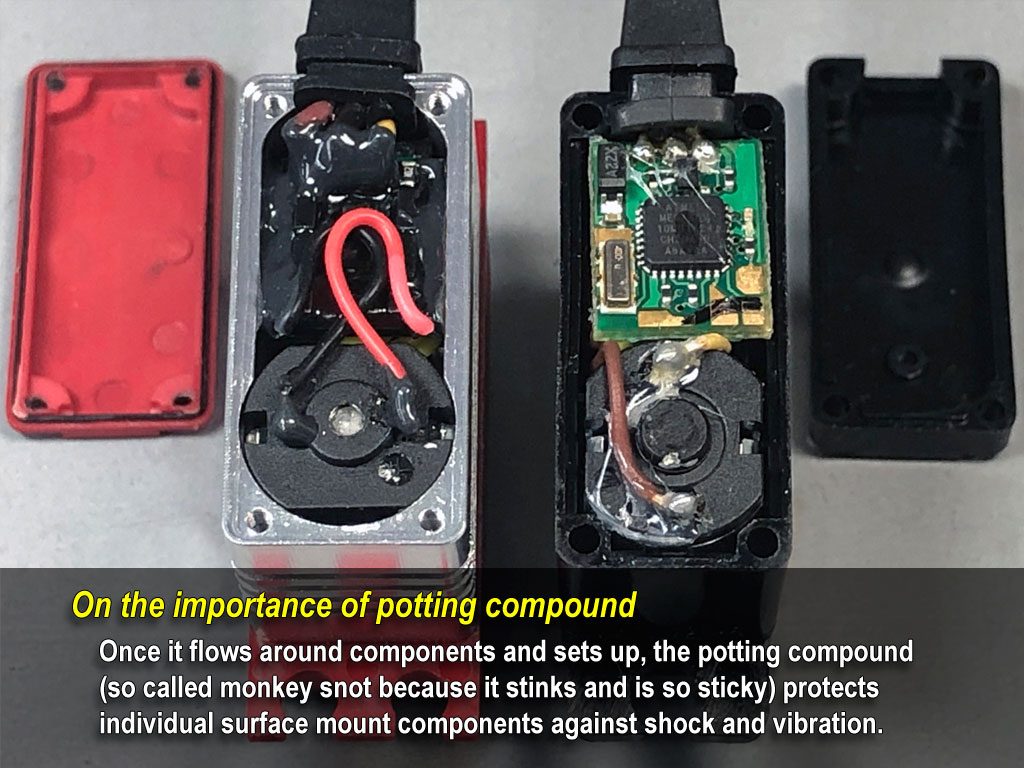
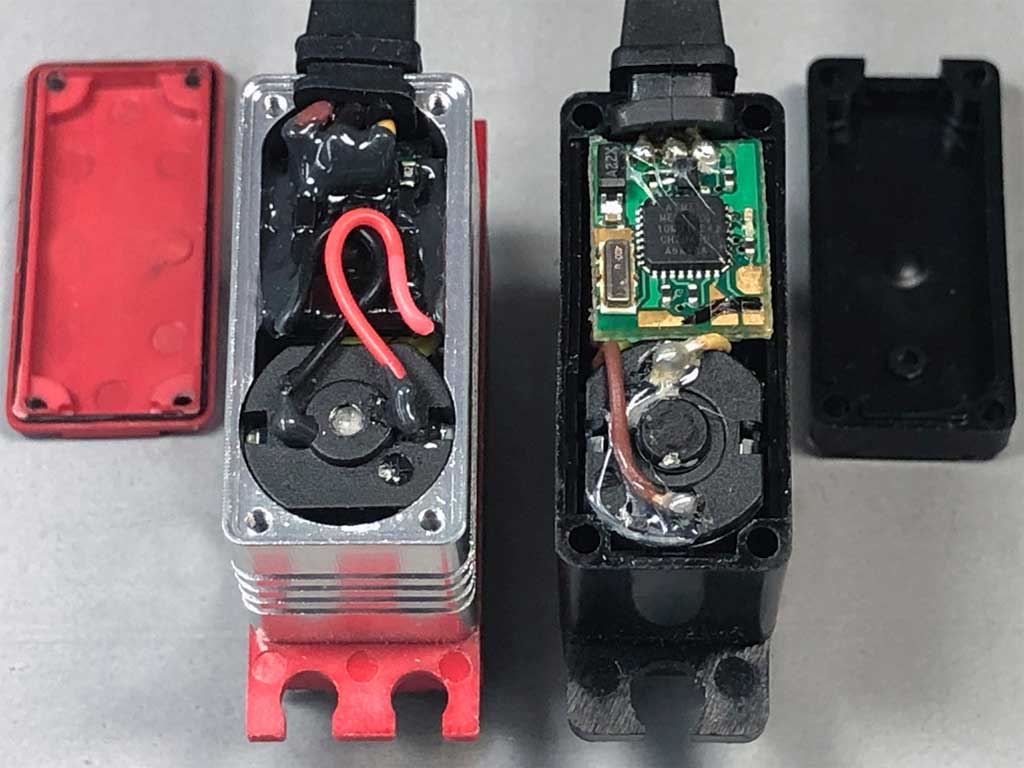
But better mounting is not all we do to help protect your investment against shock and vibration. Ever heard of potting compound? It's a 2-part rubberized epoxy we apply to the printed circuit board to protect against shock and vibration (shiny black goo covering the PCB).
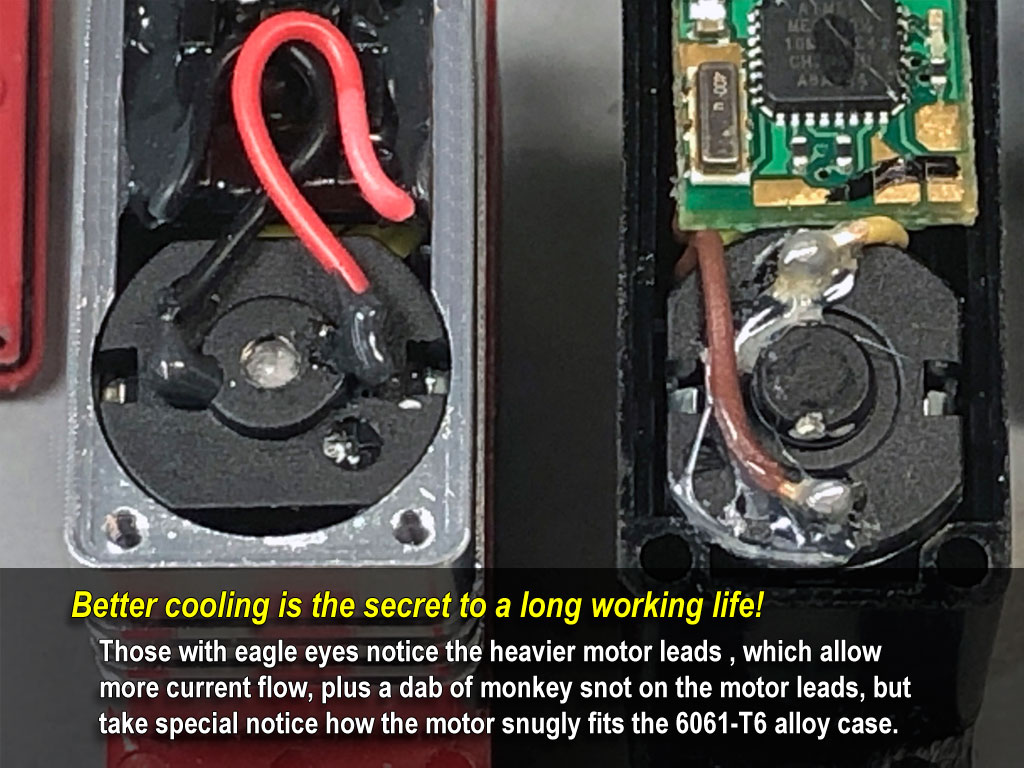
Couple of things to take notice of in this next photo. For example, this shows the o-ring for the electronic cover. But, pay close attention to the fit between motor and aluminum center case. The whole purpose of the aluminum is it acts as a heat sink.
Important because this servo makes 60% more torque!
Cooling
After all, you can't get something for nothing and more power means more heat. It's why we sweat when we run compared to walking. Same with servos, when they work hard they end up getting hotter so because they can't sweat to cool off, servo motors need to radiate the heat into the environment. And compared to the plastic center case, ours sheds heat like crazy!
This becomes especially important once you consider servos are usually mounted within stagnant air. But just using aluminum isn't enough for us. It's why we go to the trouble of also machining cooling fins into the solid billet of aircraft aluminum. If you like this, then tally more points for us!
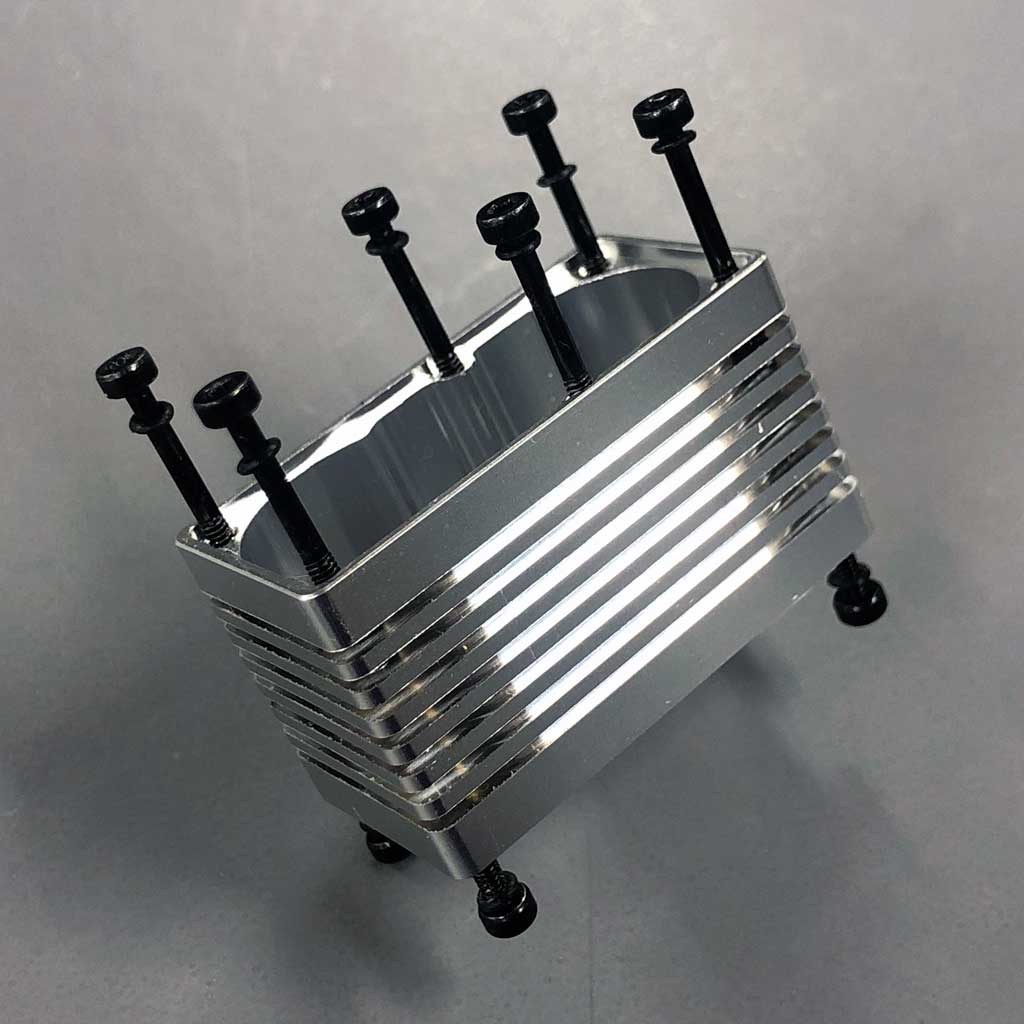
Incidentally, all ProModeler servos have a10-bolt case design with machined fins for better cooling. So many bolts, internally we refer to it as the porcupine!
Potting compound
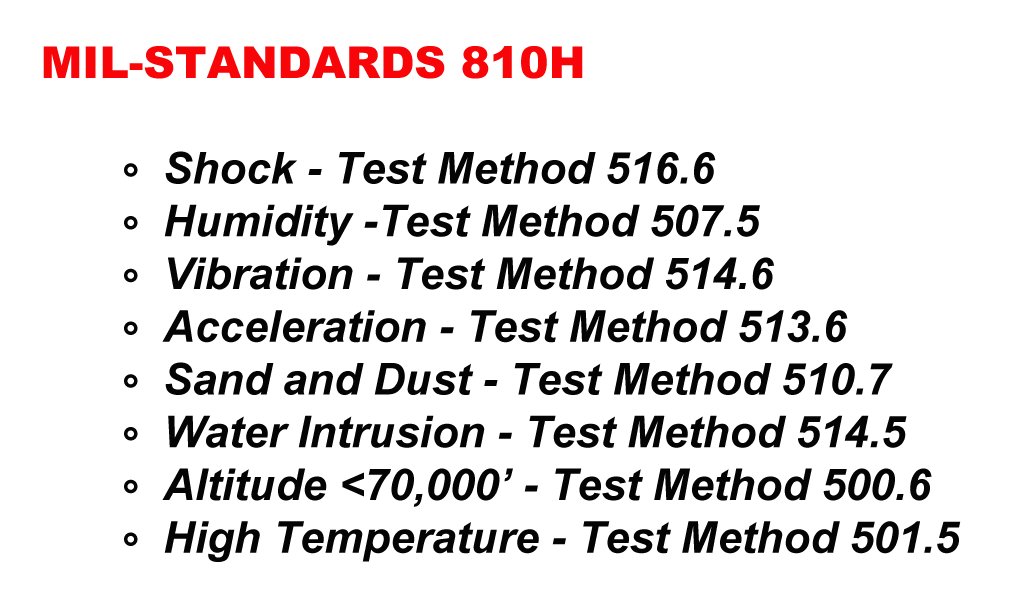
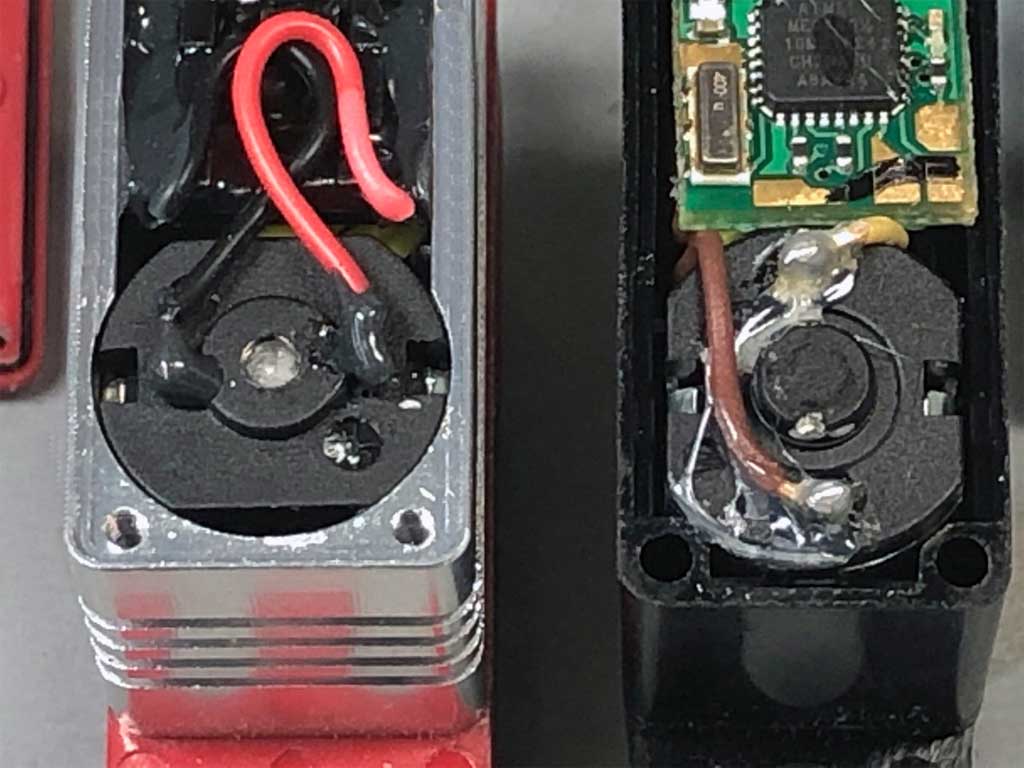
Anyway, the potting compound leads to earning a couple 810H MIL-STDs (both shock and vibration, test methods 516.6 and 514.6, respectively). Your money, but would you rather have hobby grade servos? Especially considering micros aren't just used in gliders and cheap foamies because they're often used in models equipped with engines, which vibrate!
By the way, the application of potting compound is a technique, which is used in military aviation. Point being, you're benefiting from this protection (basically it's an insurance policy for your model) because we don't produce a hobby grade servo.
But that's not all to see in this photo. Here's a close up. Notice the thicker motor wire. The purpose is allowing it to handle more current flow under load.
Sealing
Next, look the Allen heads bolts securing the case assembly together. Observe we use six in the upper section plus four more at the bottom. This, versus the usual four screws in the corners. The extra two help box the output shaft bearing.
Basically, this makes the entire upper transmission section stiffer. And this is better because it increases the working life of the gear train. After all, nobody is giving away servos, and we all want them to last longer, right?
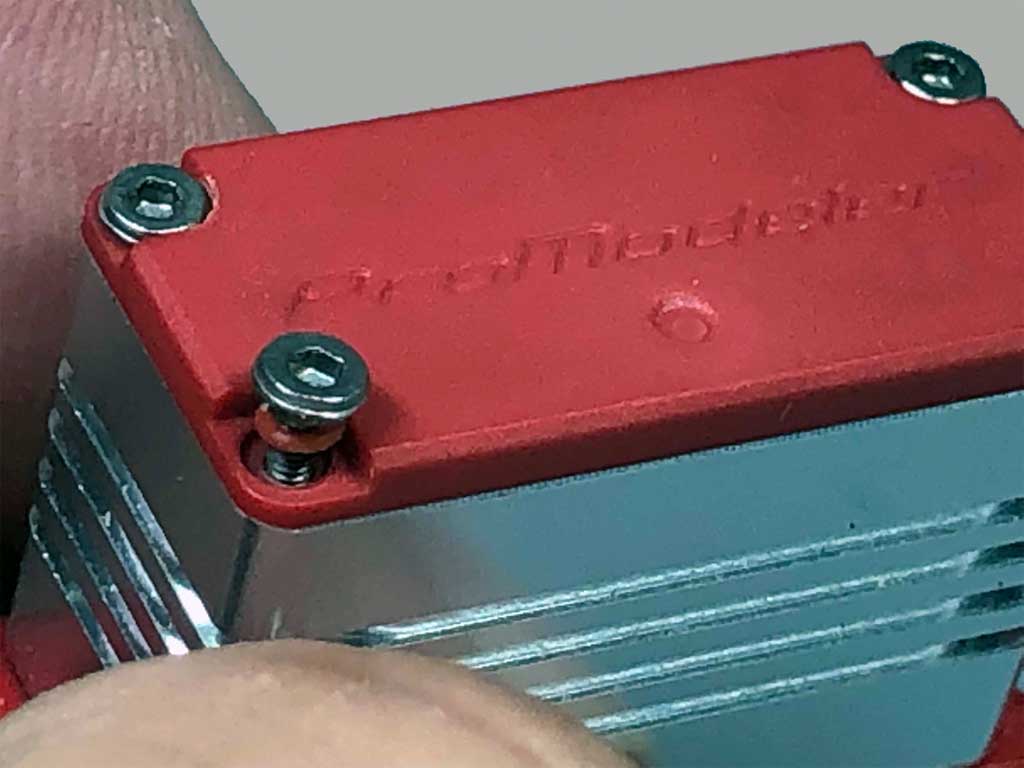
So, I've mentioned MIL-STDs more than once. This servo earns several. Honestly? This is something you don't get with hobby grade servos. Question for you is, does it matter?
Matters to our primary customer. In fact, without these, we don't earn their business. And in all honesty, we hope it helps with earning yours, too.
Next, as regards the threads in the splined output shaft (for securing the servo arm). As I mentioned, we thread ours for the common as dirt M3 instead of M2.5. Why? It's because if you lose one, finding M2.5 may be tricky.
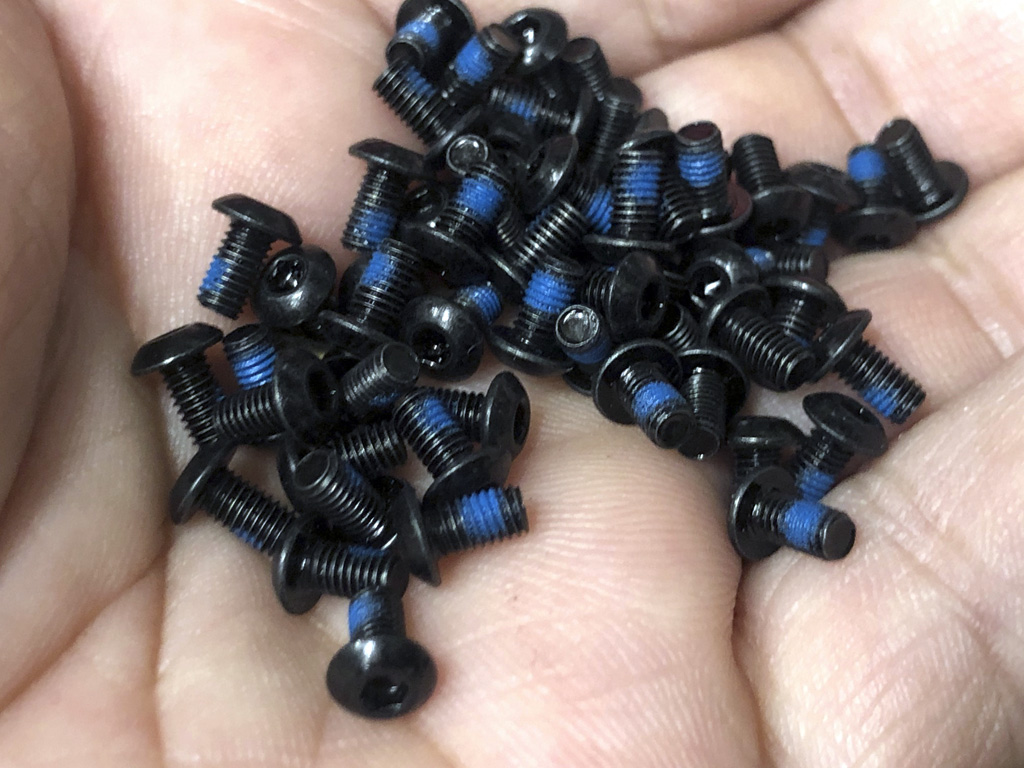
Also, let me focus on the servo arm screw. Instead of an el cheapo Phillips, with ours you get a Grade 12.9 oxide coated Button Head. Better still, we pony up for the good ones again. This time for ones with an anti-vibration patch (the blue stuff).
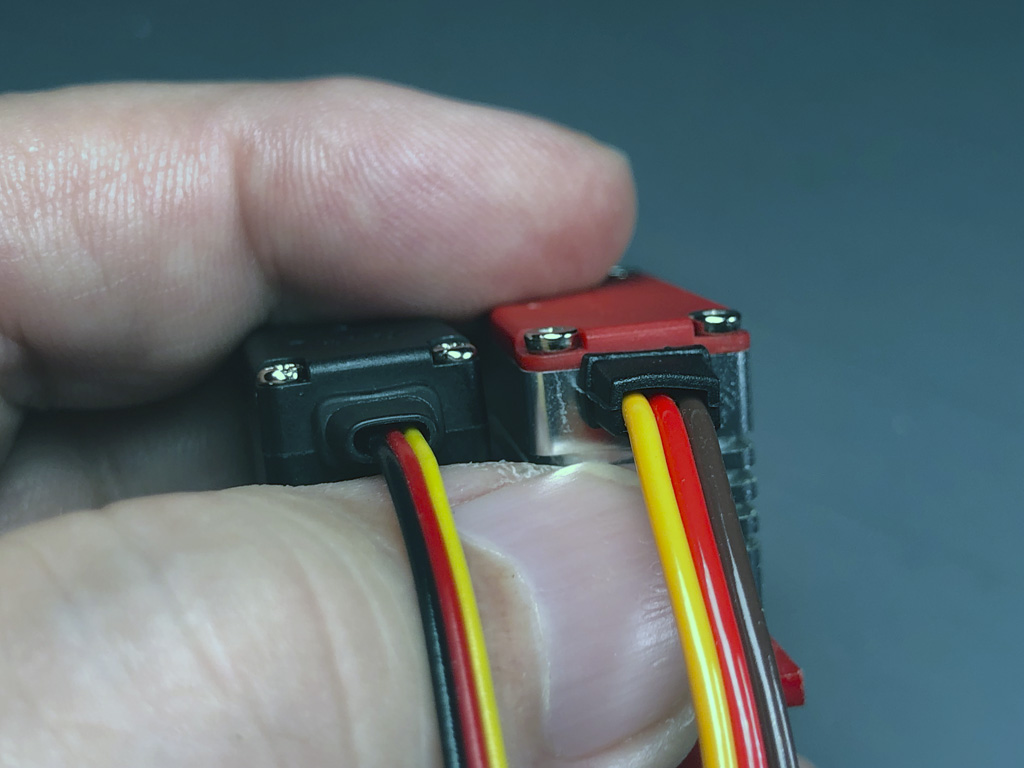
Addressing our thicker servo lead. It's due to our servo making more torque. Since extra power doesn't come out of thin air, thicker wires deliver more current, and this is important, with less voltage loss under load.
Note; this is all disclosed within the specs.
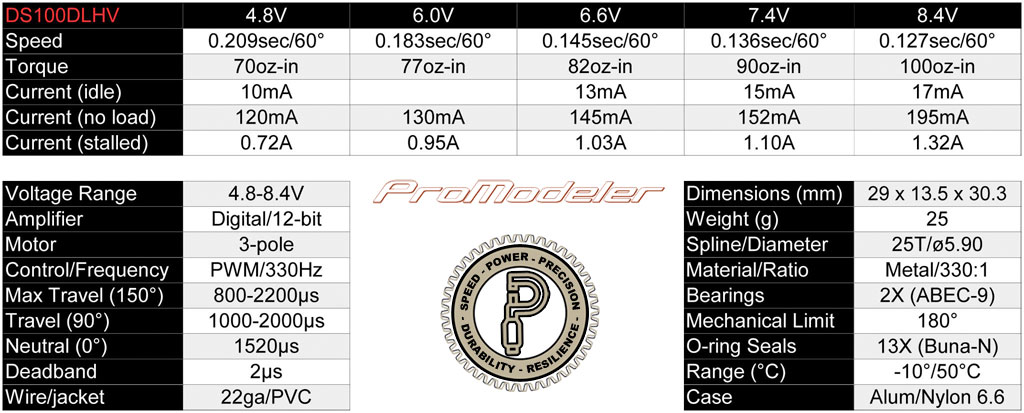
So, let me guide you a little about specs because we share many details, others don't. This, to include the wire gauge (bottom left, it's 22AWG).
And if you look to current (stalled) within the 8.4V column, that's where you see this puppy can draw north of 1A at full song. And this is when thicker wire is better because it means delivering more juice to the motor when it's under load.
But there's lots more to see in the specs chart.
Maybe you noticed we disclose the gear ration (330:1), the composition of the o-rings (Buna-N), temperature range, deadband, control frequency, spline and diameter, and more. So there's lots of details for the gear heads amongst us!
Meanwhile, maybe you're wondering who cares if the DS100DLHV transmission section is stiffer than that of the HS-5085MG because we use six assembly screws, or that four mounting screws prevent rocking, and thicker leads allow the servo to draw more current under load?
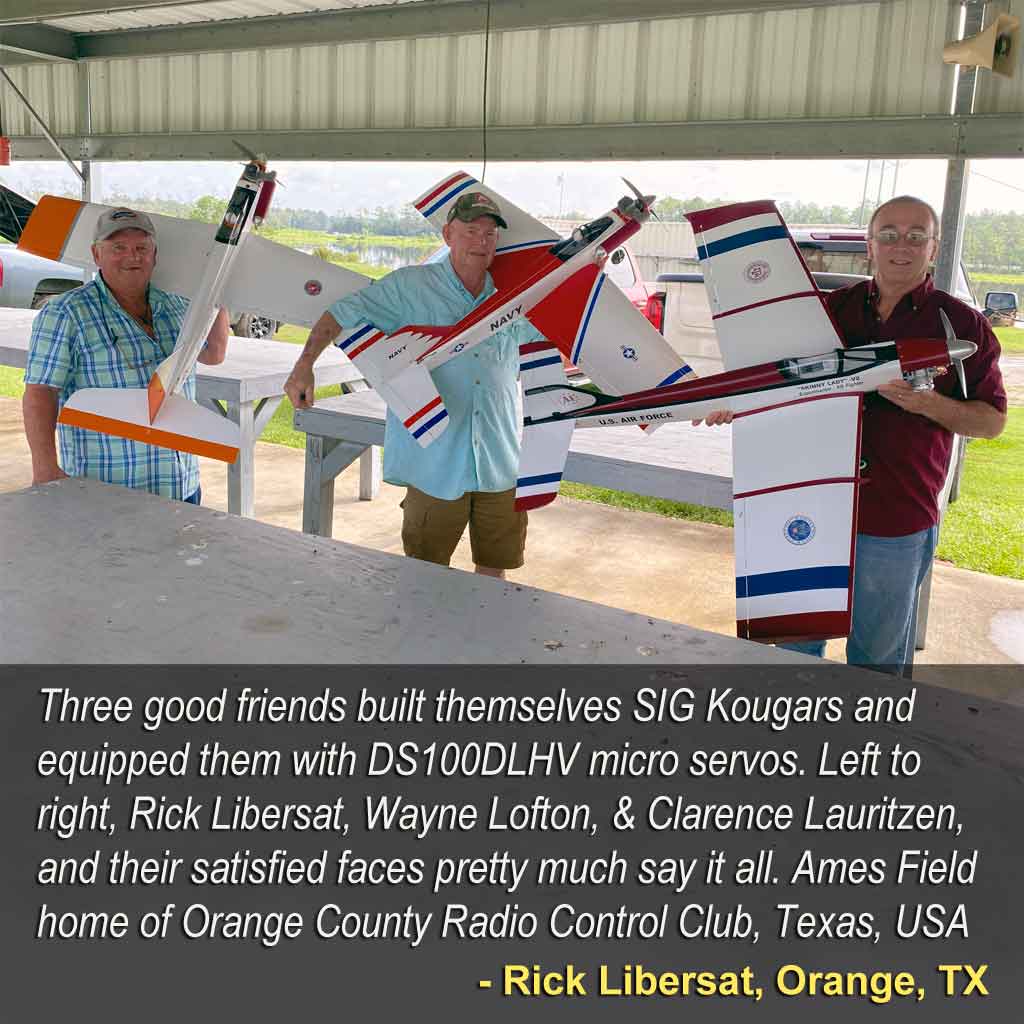
We do because we don't know how hard you'll be using your servos. Take these fellows by way of example. They overpower the crap out of their SIG Kougars and then fly the stink out of them!
Our micro either stand up to this kind of abuse, or we won't put our name on it.
Major point being, we design whilst trying to account for the worst possible case. Talking about designing for guys like this next fellow, Doc Austin!
Honestly? When we get pilots of Doc's caliber loving our servos, then we believe it means odds are pretty good others will also. Hopefully, you!
Major point of the above being, some of you beat the crap out of our servos! And if getting your money's worth is important, then it means buying servos designed to last, and last, and last . . . think Energizer Bunny!
So, what actually happens when people fly hard is the gear case begins to wear. Basically, the teeny-tiny shafts fitted to the case (upon which, the gears to rotate) begin to distort the softer plastic material. Since the shafts are stainless steel, which is lots harder than the plastic, then something has to give (and it's not the steel).
Point being, these shafts fit into molded bores (smooth blind holes) in order to align the gear stack. What's more, the assembly is performed to an insane level of precision because these gears are very small. Thus, any misalignment is magnified.
Note; o-ring on the output shaft of the ProModeler servo protecting against intrusion
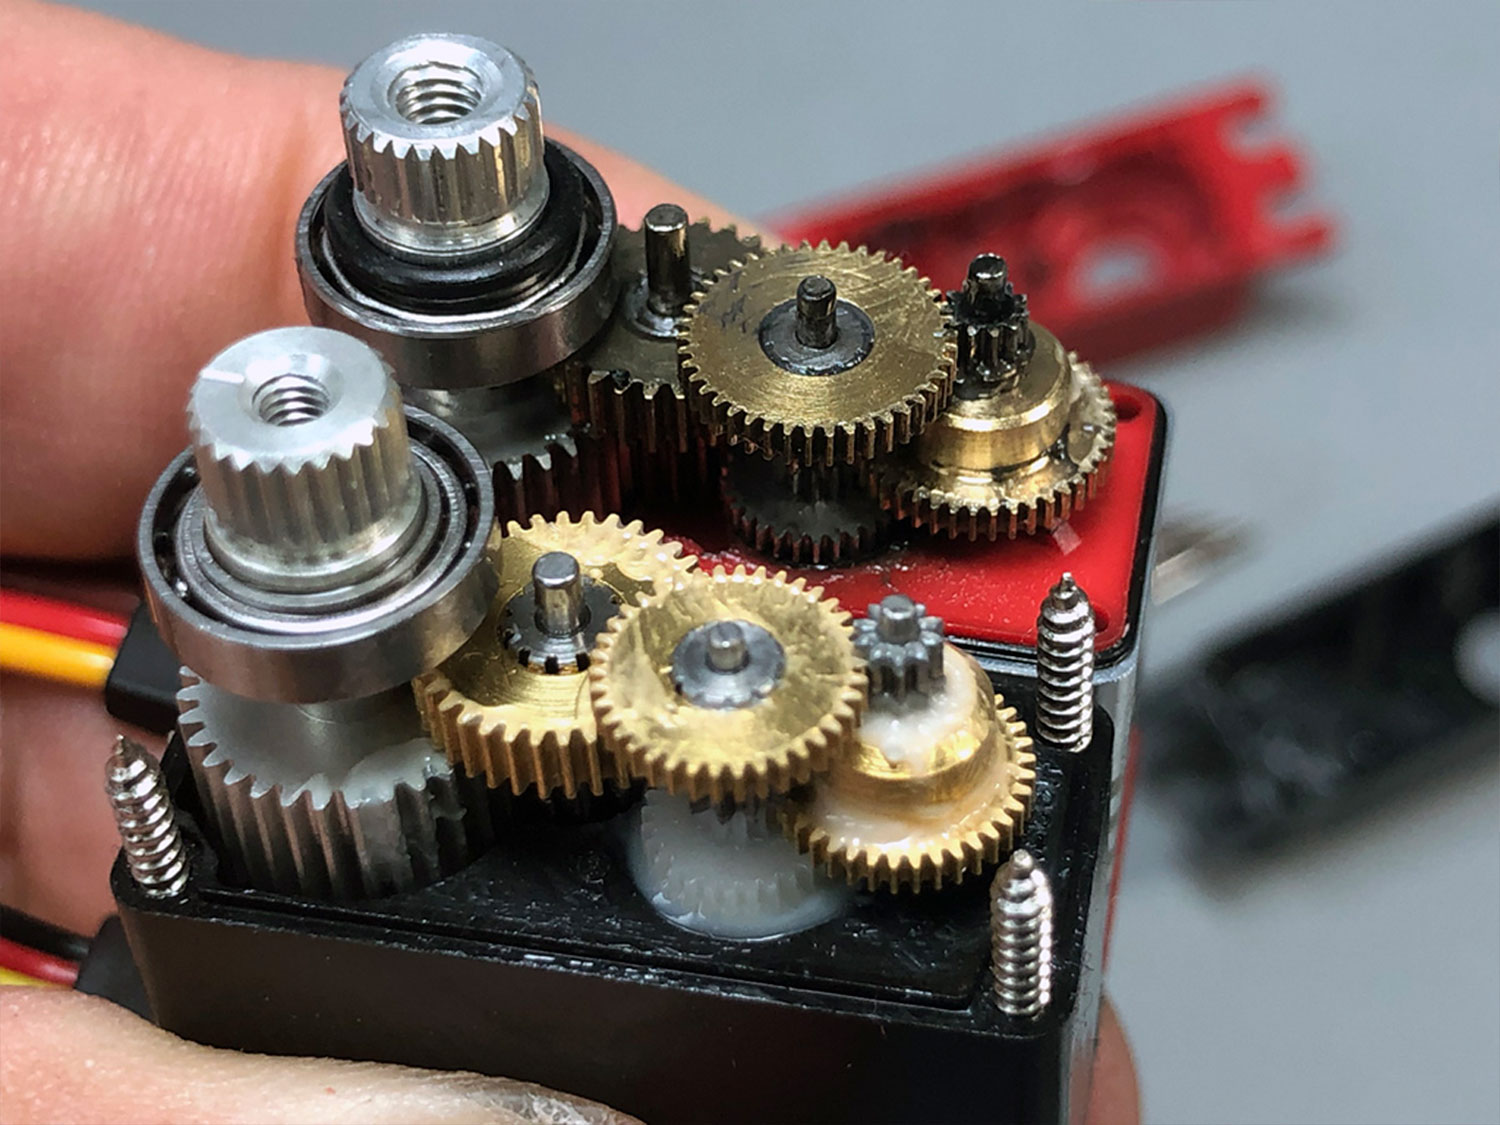
Thus, compared to using micro servos to control a slow flying glider, or maybe a high wing foamy, flying highly aerobatic models aggressively with hobby grade servos may mean not getting to 50 flights before they won't center like they once did, e.g. like when they were brand new.
But micro servos can and do last a long time when the case where gear shafts are fitted is harder than plastic.
By now maybe you're wondering why our servos hold up better to abuse? Well, another thing we did was we improved on the all-plastic case used in Hitec HS-5085MG case. No, we're not speaking of the alloy center for better cooling. Instead, it's where we went to what's called an insert mold.
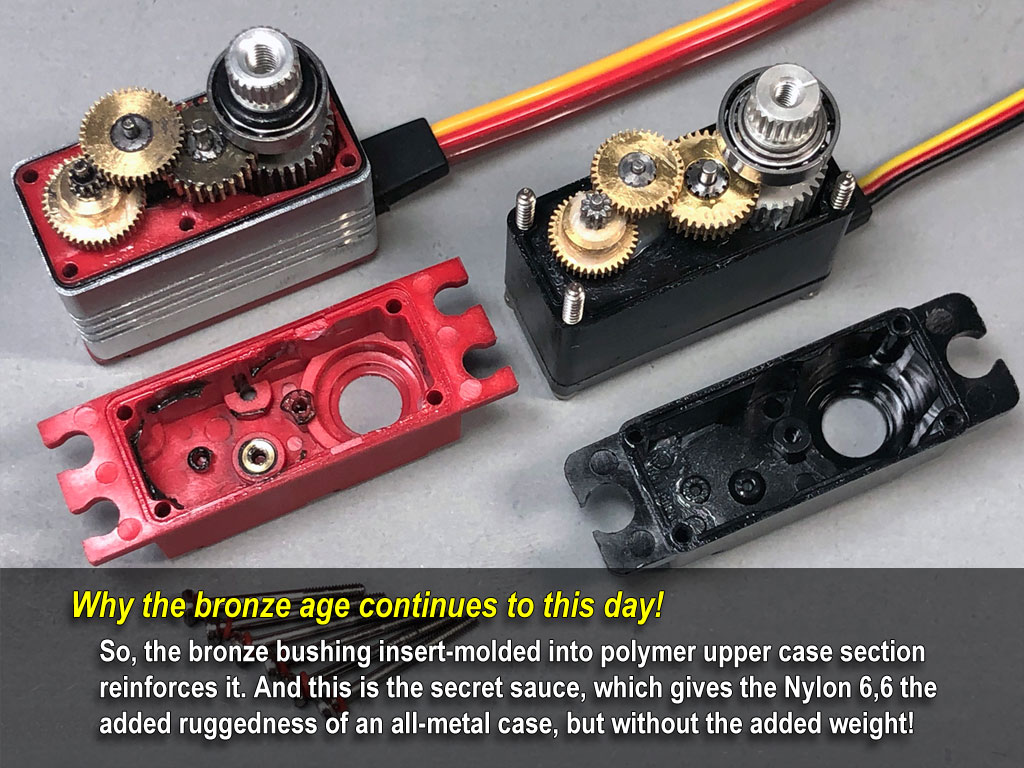
Basically, to reinforce the plastic, we insert a bronze bushing. It's molded into the plastic to strengthen where the gearshaft tends ot deform the plastic!
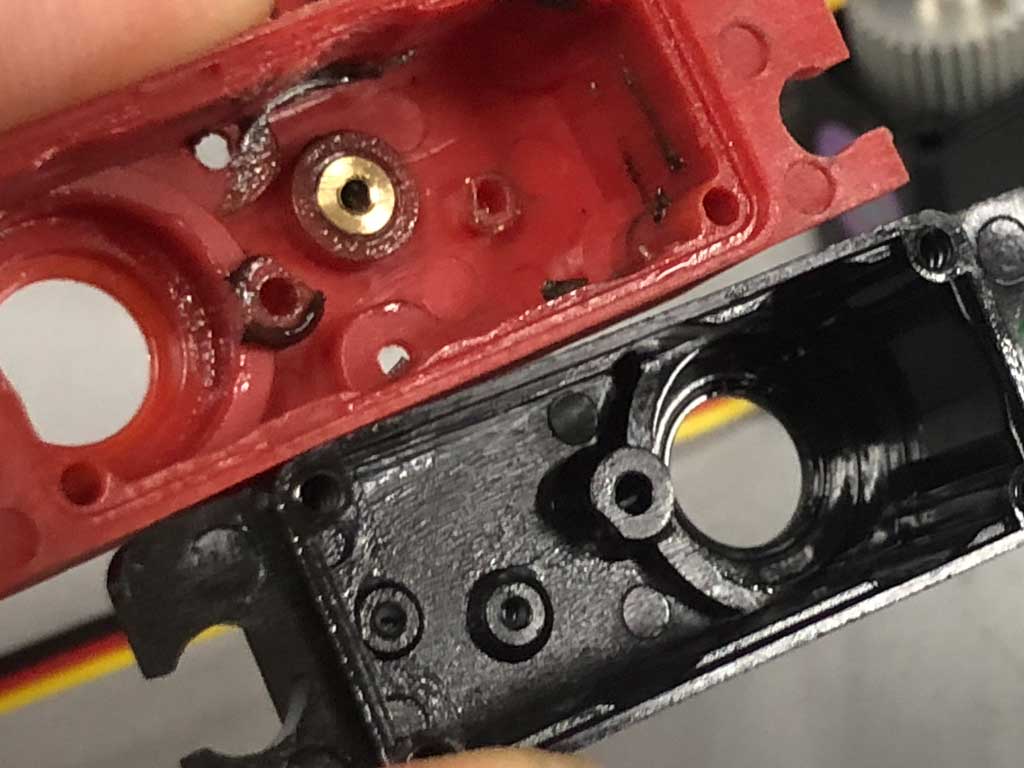
FYI, cases are injected of Nylon 66 (an engineering-polymer also used for Glock handguns). Reinforcing them means going from the 80MPa of the polymer to the 470MPa of the bronze. And because the diameter of the bronze is larger, it presents more surface area to the plastic, which prevents deformation under load to begin with.
Basically, our servo is made to be more rugged in the design phase. A bonus? Crash survivability improves! Moreover, this is the secret sauce in the construction of ProModeler hybrid case servos. It's the hardpoints reinforcing the plastic, which keeps the servo light, and maintains precision for many years.
Point being, it's not aggressive aerobatic models, which stress micro servos really hard. EDF/turbine powered jet models so, also. And whenever flight loads may exceed that, for which the plastic was designed to withstand, you may get plastic deformation.
Moreover, once the bore within the plastic case is damaged - even in the slightest - the precision with which the servo was assembled is gone. And as a practical matter, it means the gear mesh becomes sloppy. The corollary being, that's when the gears also begin wearing faster (due to misalignment).
By the way, we'll admit the damage doesn't happen quickly (or at all) with slow flying models. But it definitely happens with models, which load the servos, really hard. And heavy models load the servos quite a bit also!

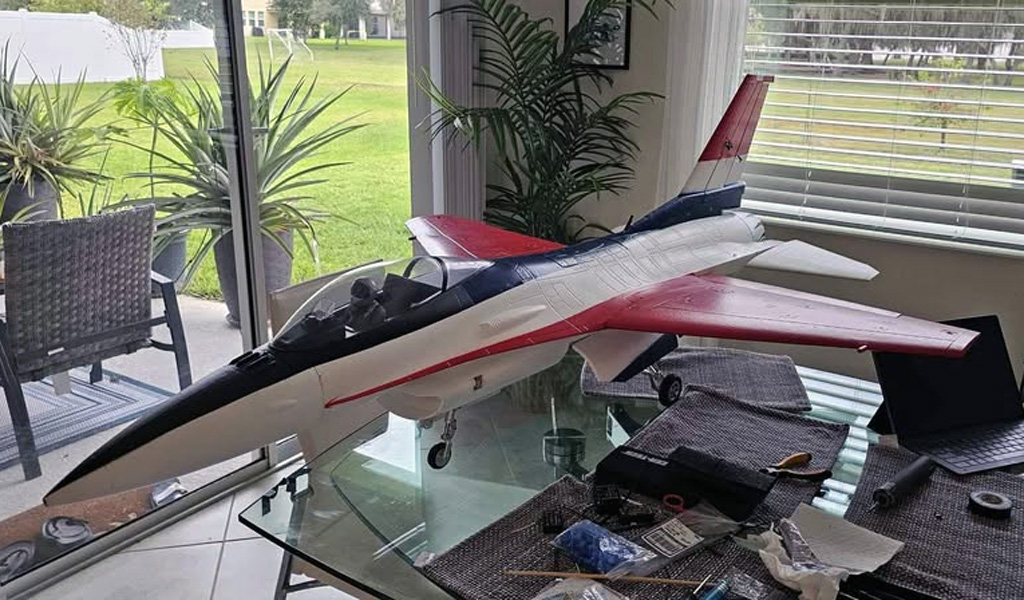
By way of another example where micros servos are used with success, take this gorgeous HSD Jets 105mm F-16. This fast and powerful 12S EDF model comes equipped with, quite frankly, builder's grade servos.
Moreover, it's the opinion of many this sort of servo will always have a reduced working life compared to once built better to begin with. It's just a nature of the beast kind of thing.
Part of what led this owner to elect to use ProModeler servos is wanting to protect his considerable investment in the aircraft; $1500 plus shipping at the time of this article's update (4Q2026).
Question for you is this; what if it's you upgrading servos? Maybe for something like this lovely E-flite Carbon-Z T-28 Trojan 2.0m? No, it's not as fast in flight as the EDF above. Nor, with much smaller control surfaces, can it be flown as aggressively folks fly XA models like ones offered by popular brands like AJ Aircraft, and Extreme Flight.
Nevertheless, if you've had it a long enough that it's time to update from the stock servos (ones equipped with Nylon gears), then do you go cheap with stock replacements, or are you a buy once, cry once kind of guy? Considering one of these models will set you back a few hundred bucks (and which, in no universe is this chump change), many agree this would be a great candidate for really good servos.
After all, it's a model that flies so good folks plan to keep it in their fleet because it's proven itself worthy of top notch servos.

So, if your choice is opting for a set of Nylon gear replacement servos versus metal gear servos, it's an easy decision, right? However, do you opt for hobby grade metal gear micro servos, or go one step further with ProModeler micros built to MIL-STDs?
Honestly, this should also be an easy decision. Especially as unlike the team at E-flite, you have a freer hand. Why? It's because you're not equipping a container load of these things! Saying they're concerned with equipping hundreds at a time, and you? Just the one . . . yours!
Next, what about applications for other than flight controls?
Non-flight control applications
Servos aren't just used for flight controls like aileron and rudder. Other applications spring to mind. For example, this next fellow came across us and bought them for the gear doors of a really sweet scale model.

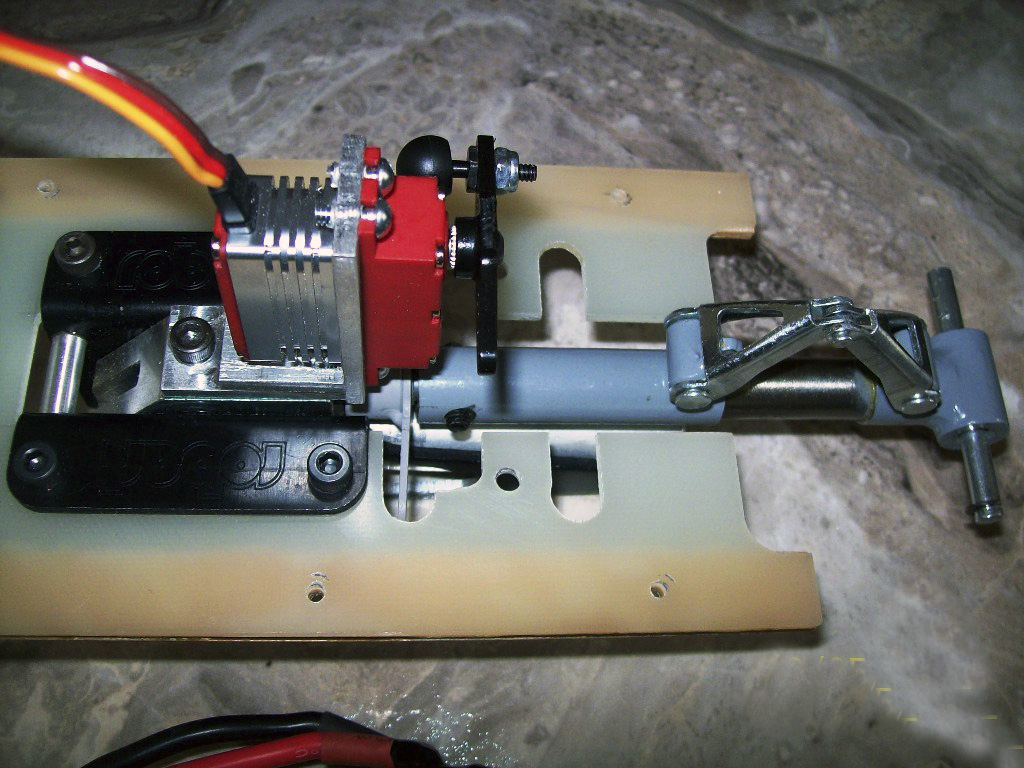
What else? This fellow (Josh Harel) used them for steering his ginormous Boeing 727 on the ground. Here a DS100DLHV is mounted to the trunion of the nose gear retract unit.
Other considerations
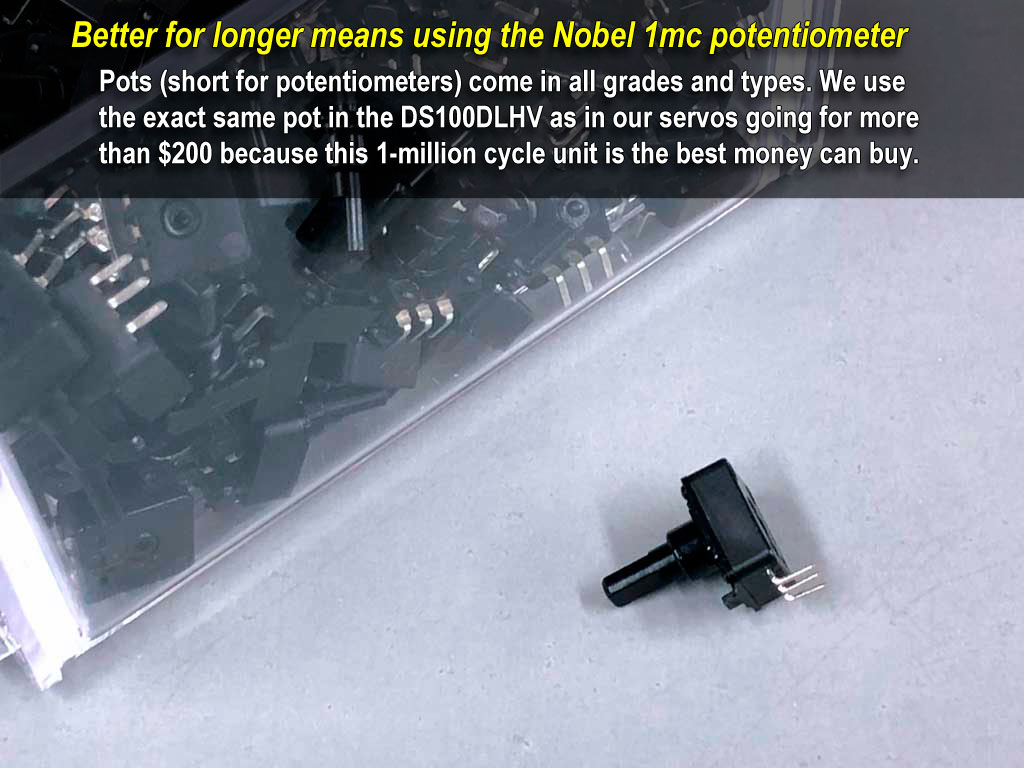
Competition pilots - especially those who fly precise maneuvers favor ProModeler servos because they center better. This is because we use MIL-SPEC components (plus a genuine Japanese Nobel-brand potentiometer).
This is of particular important for IMAC and pattern competitors because they fly a lot and thus, have to go through and R&R their servos every few years.
Why do we place such an emphasis on competition pilots? It's because these pilots are really, really dedicated. By this we mean they fly maybe 30-50 times a week (and they do it week-in, and week-out). Basically, it's de rigueur for them to practice 3X a week plus 2X more on weekends.
Ultimately, for us it's a no-brainer what we use in the way of components. This circles back to how I began, it's because we're modelers like you - meaning we go fly on weekends same as you. Thus, we think our design decision of sticking with the tried and proven potentiometer is not even up for discussion . . . but it's 'your' model so it's on you to decide which technology you'd rather trust.
Since replacing a potentiometer is easy (a matter of three solder joints) pros find our attitude toward offering spare pots refreshing. These, in addition to mechanical-spares like gears, cases, etc.
Wrap up
Bottom line? This DS100DLHV micro servo is a game changer! While this tiny rascal is size-wise very much like the Hitec HS-5085MG, we think we give you more bang for the buck and hope we've proved it.
Note; some say this is the world's best micro servo but all that really matters is what you think.
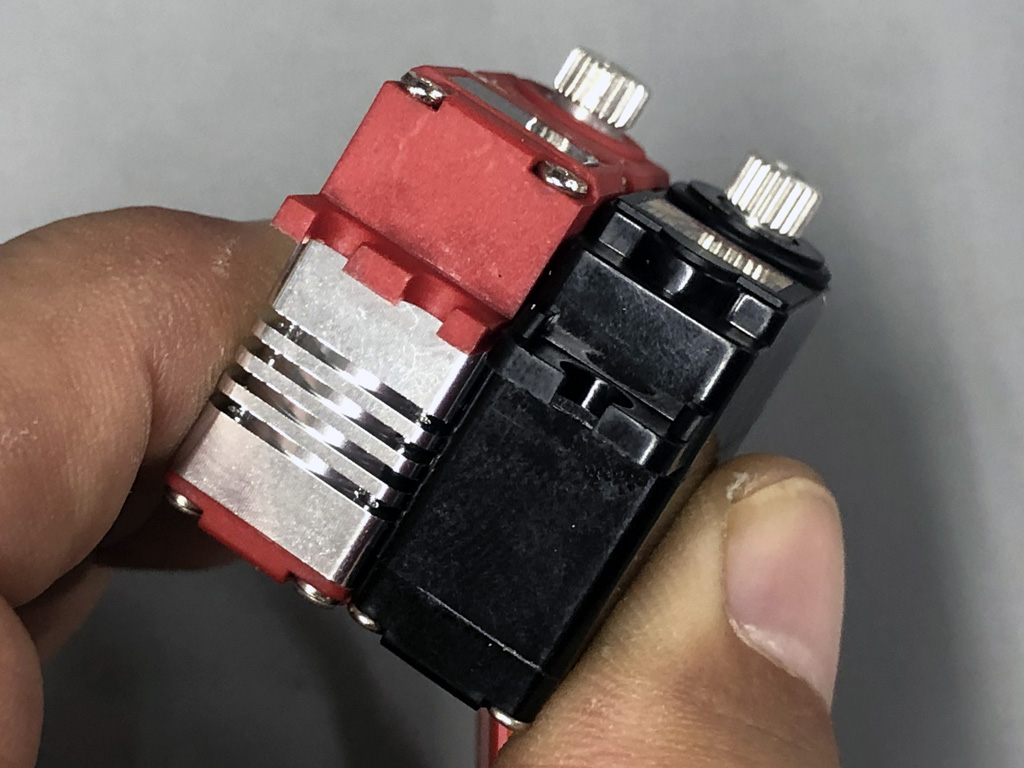
We have identified areas where we believed their micro could be improved and set about making our micro servo better. Of huge importance are the bushings in the case (the bronze hardpoints) because these support the gearshafts upon which the gear rotate better.
Similarly, it's impossible to overlook the efforts made at protecting against shock and vibration by applying potting compound to the PCB. That, plus supplying the servo with 4-point isolating mounting hardware.
Using an M3 vs M2.5 screw to attach the servo arm is nice if you ever lose one because M3 are easier to source. But that we give you a button head Allen with thread locker on it already is, in the words of customers, a nice touch.

Of course, that there are 13 o-rings and seals protecting these servos is a big deal if water intrusion is ever a factor. Everybody won't care, but those of you who do, you really appreciate this (it's such a big deal for our primary customer they added a sand and dust intrusion requirement to the contract and thus, test method 510.7 had to be met in addition to 514.5).
Also, and on a personal note, with ProModeler DS130DLHV servos on flight controls, and a DS100DLHV on the water rudder, these servos have done nicely on this Saito .90 powered, Goldberg float equipped SIG J-3 Piper Cub model for now, going on seven years. It remains one of my favorite models.

The thicker lead allowing more current flow and less voltage drop can be important. Not so much in a glider or ordinary foamy flown for fun, but when the servo is being called on to deliver rated torque and is getting stressed to the max? Then yes, this is a big deal.
Add to this, our assembly screws feature machine threads and go into aluminum vs coarse thread Phillips head screws threading into plastic. However, this is only a factor if you disassemble servos for maintenance. Saying if you compete in SPA pattern and replace pots every few years, then keep this in the back of your mind.
Machining the center case of aluminum is a big deal. Plastic is a pretty good insulator and because our servo outputs so much more torque, it needs to shed heat better. Aluminum does this and that we go to the effort to mill cooling fins into the case lets it shed heat better, still.
Closing thoughts
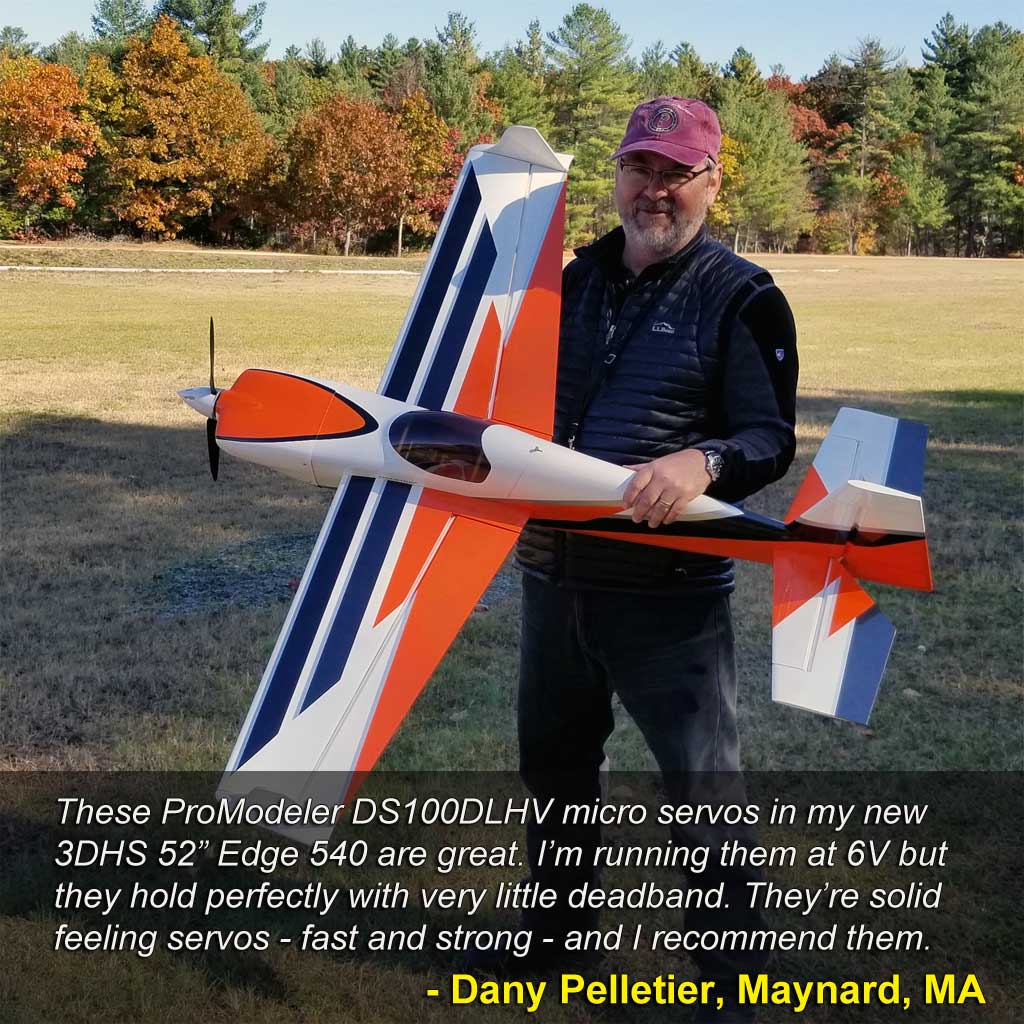
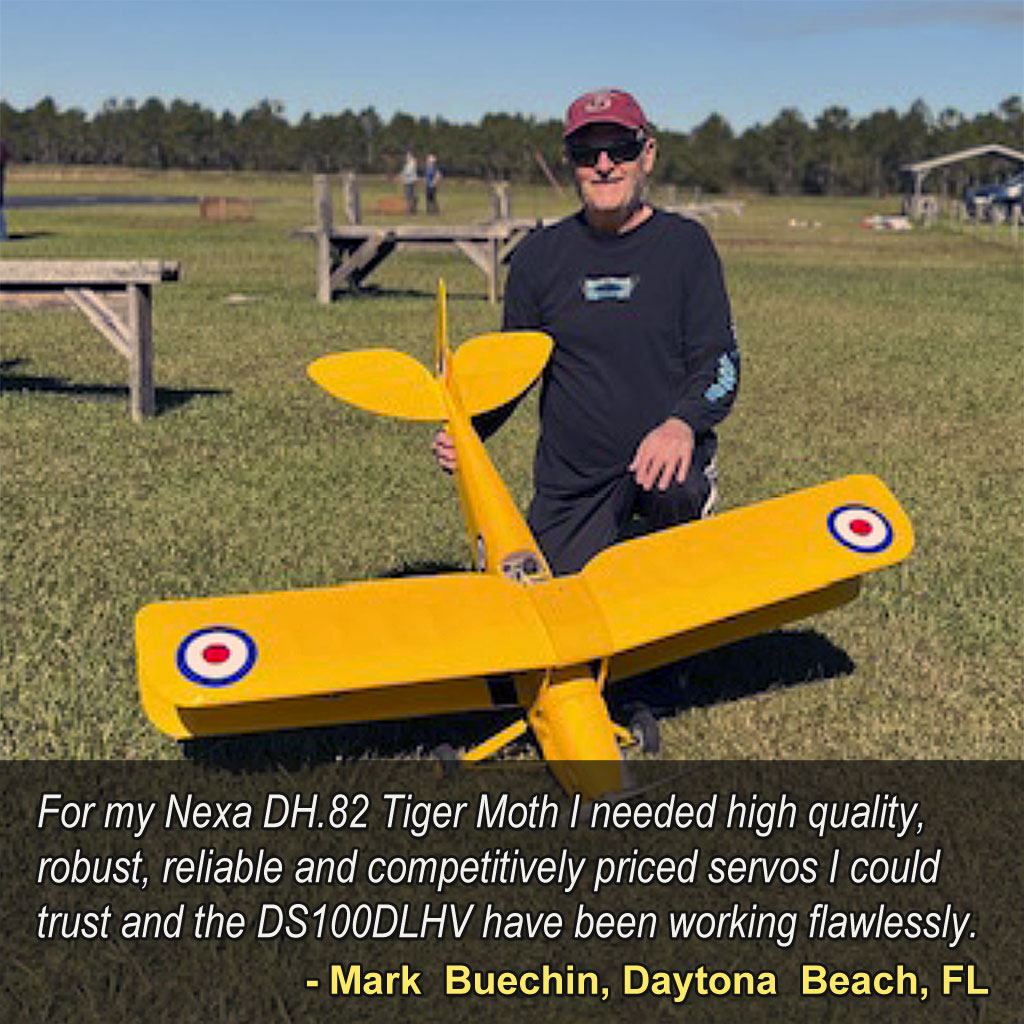
So in addition to photos of the products juxtaposed side-by-side in our attempt to show where we have made the DS100DLHV a more compelling product, we have also shared photos of customers. What's important about these is the words, not the happy faces or the pretty models.
Like, we could but don't use sponsored pilots to mouth the words we pay them to say. Instead, we rely on real people. Folks sponsored by MasterCard. Ones who say what they damned well please and whose good opinion about our product isn't for sale.
Point being, these are real faces, real names, real people . . . believe them!
UPDATES
4Q2019 - nice update across the line this year. In common with all our servo lineup, the DS100DLHV now incorporates soft start. This is a wonderful feature because control surfaces are brought to center slowly instead of with a bang when you power up the model.
1Q2021 - added a few photos
2Q2021 - added a few photos
2Q2023 - added a few photos
1Q2025 - added a few photos
4Q2026 - added a few photos
Caution
These are tiny servos with even tinier gears. Whether it's ours, or the Hitec, operating them manually via the servo horn may damage the the gear train because the teeth are so minute! Why?
Simple, it's because you're loading the teeth in a way for which they're not designed. Basically, the transmission is comprised of gears designed to take the force of a weak motor, and multiply it many times until we get to the final drive ratio.
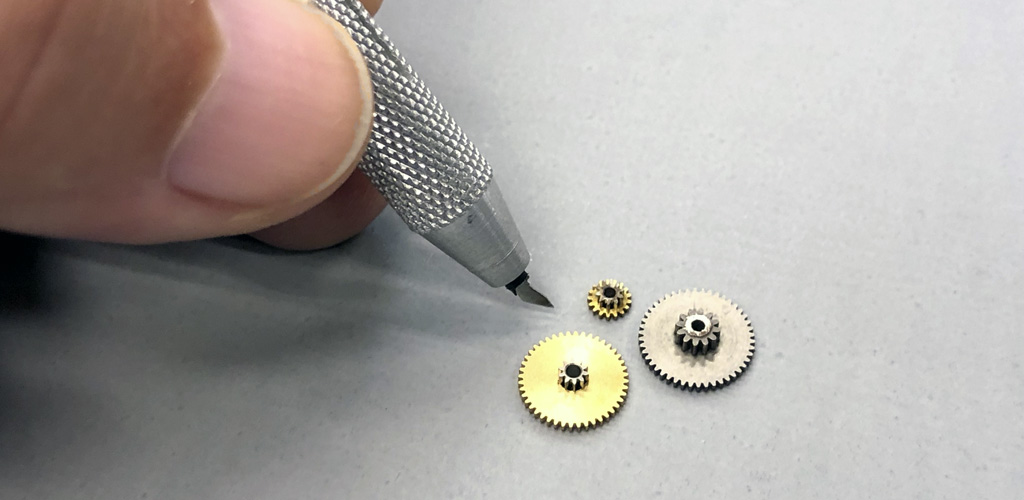
Way it works is individual gears are designed so that a small pinion drives a larger bull. This happens in a ratio ranging from 1:3 to 1:6 through a series of combo gears to reach the final ratio, which can vary from 1:150 to over 1:600.
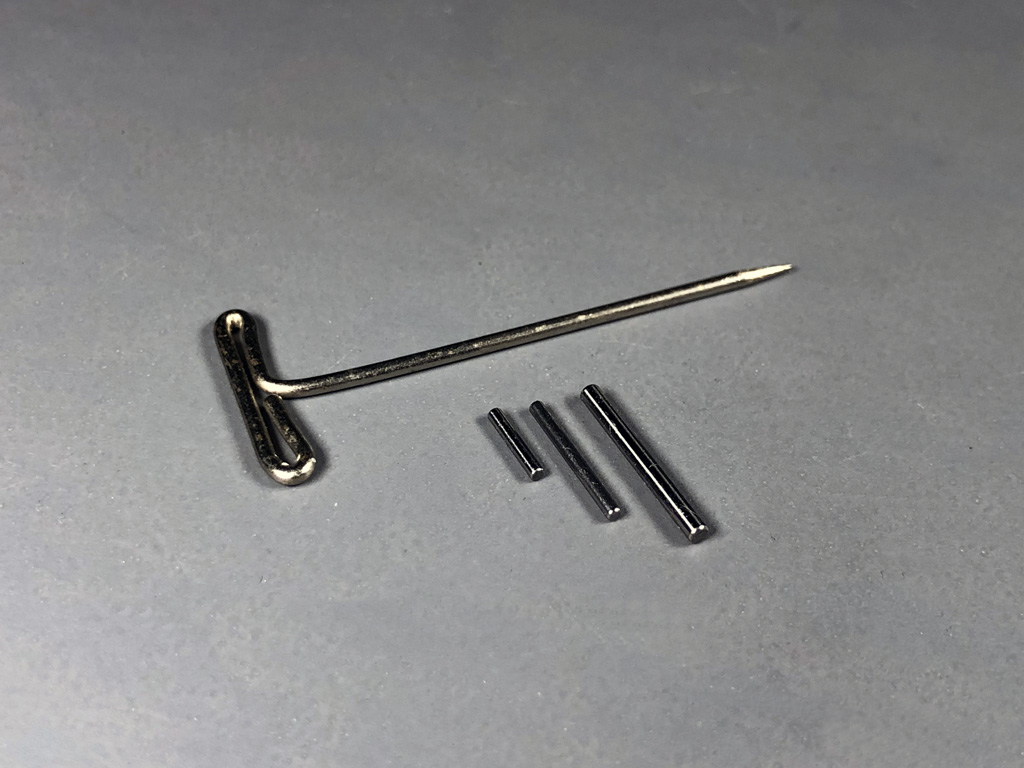
Next consideration is how small the shafts upon which these gears transfer motion actually are. Like, we're not dealing with a Muncie rock crusher here, these mechanics are quite delicate. So this next photos shows them displayed besides an ordinary t-pin to help you grasp what I'm trying to covey.
Bottom line? Grabbing hold of the servo arm and checking the compression of the servo by zinging it back and forth is driving the servo motor through the entire transmission's gear ratio, which for the DS100DLHV is 330:1, risks damaging the gears!
Note: gently moving them, e.g. returning a control surface back to center, e.g. when folding a helicopter's main rotor blades into the holder won't damage anything.
Bottom line? If you like to zing-zing the servo back and forth using the servo arm, just don't. Not for our servos, not for the Hitec, not for any servo, micro, mini, standard, or larger . . . regardless of brand. Honestly? It's a stupid thing to do.
Last thing
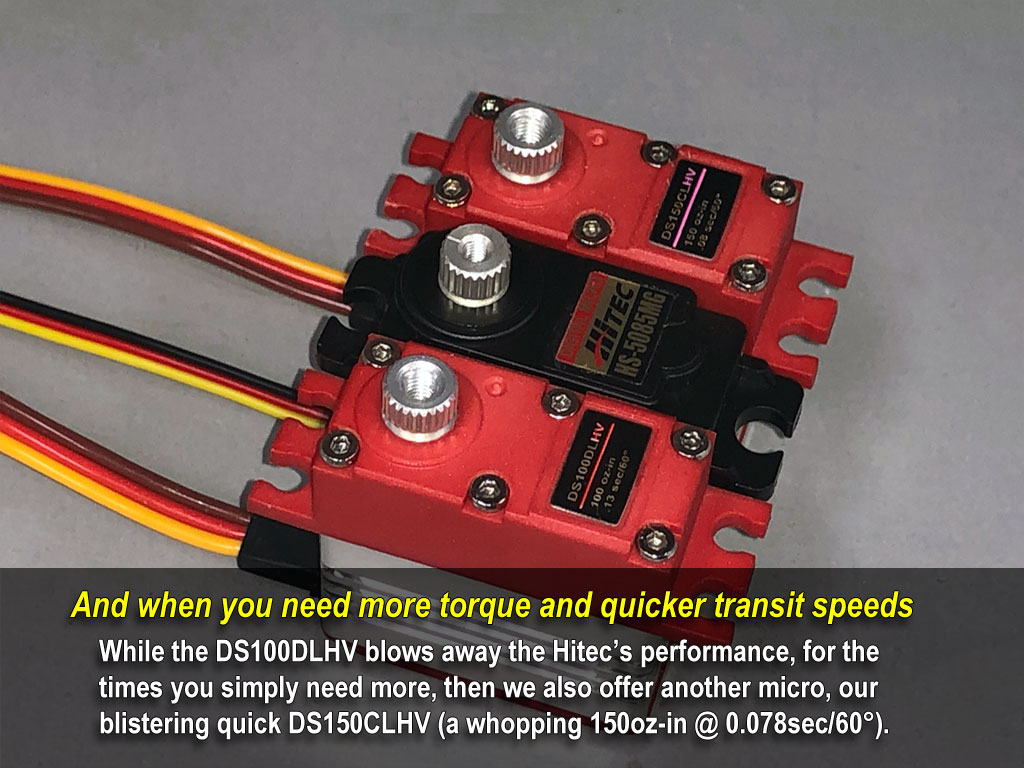
There are models for which, the DS100DLHV offers neither enough torque or speed. If you find yourself in this situation, then know this, we offer one other micro because unlike competitors, we have just two micro servos. Our DS150CLHV micro is physically the same size as the DS100DLHV. However, it's the beast mode version (think Hulk vs Dr. Bruce Banner).
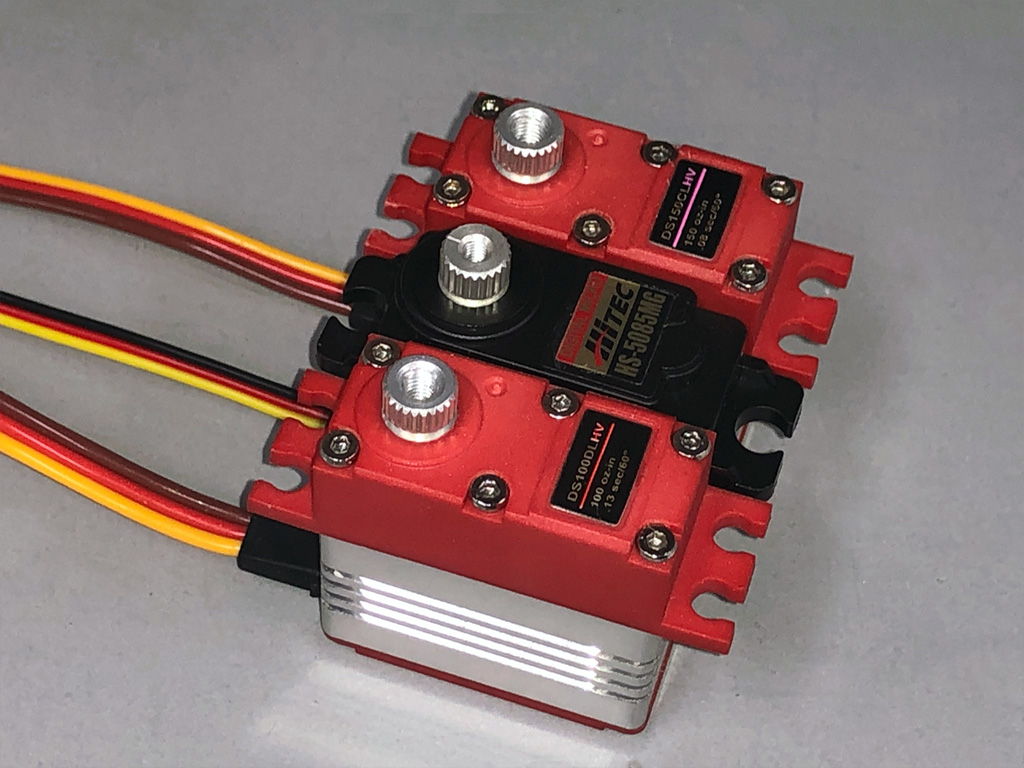
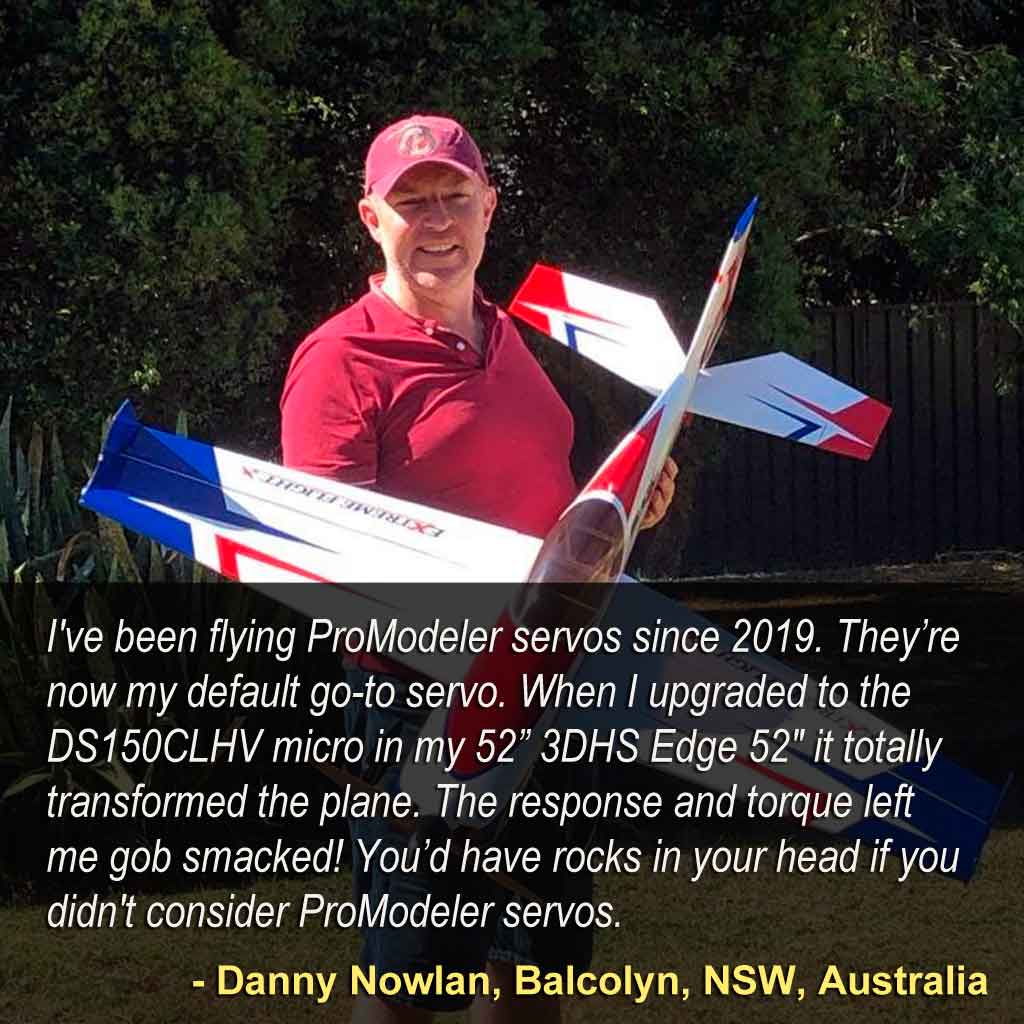
So, while the DS100DLHV blows away the Hitec’s performance, when you just need more, then our blistering quick DS150CLHV (150oz-in @ 0.078sec/60°) is the better alternative. And don't just take our word for it!



