
Introduction
Once upon a time, it was all I could do to have 'one' RC model airplane. To have another model meant I'd either crashed, or sold it. This, because back then I'd have to repurpose my engine and flight pack into the freshly built model because the avionics were stupid expensive. And putting numbers to stupid expensive, my Orbit 5-channel cost $349.99 so that would be $2700 today according to my inflation calculator app (20206).
So one model, one man is how it was for everybody back when I built my first model. What's more, for a young like me to be involved was pretty rare so I never hung out with boys at the flying field, it was always grown men. And they treated me like an equal, same as I've observed today.
As to the model airplane itself, in the spring of 1972 I had the equivalent of the Sear Catalog which went everywhere with me in my backpack - even to school. And what I lusted for was a Midwest Products, Cardinal Squire costing $59.99, plus tax. Meanwhile. Bill the guy at the local hobby shop urged me to build a Carl Goldberg Models, Falcon 56 instead ($24.99). But the catalog cut showing the box art of the Cessna taking wing in the wish book had done its job. Basically, I was so captivated he couldn't talk good sense into me!
On the flip side, due to having foam core versus built up wing panels, it led to me making the acquaintance of DB Products' Southern's Sorghum, a tan-colored water-based contact cement used for sheeting wings at a fairly early age (no longer available else I'd still use it even in a world of 3M spray-type 77 contact cement and finishing epoxy for attaching skins).
Anyway, while the cardinal's wing would be more tricky to build (and the model itself cost a fair bit more than the Falcon), I ignored these roadblocks because to my eyes this just meant learning somethign new and more yards to mow and rake. And FWIW, at 14 with no car and any type of job being 10-miles away, a job for pocket money invariably involved shank's mare.
Thus, during the spring and summer months I made money mowing (fall and winter was raking). Since my going rate was $3-5, it meant doing another 10-15 yards. Fortunately, I've never been shy about working for what I wanted so a few extra weeks of after school work wasn't going to put me off (and I already delivered The Birmingham News' morning paper 7-days a week, on my bike).
Point being, I wasn't rolling in dough but I was pretty much earning my way in regard to pocket money (versus begging my parents). So as long as I was willing to put in the extra work, and unlike a grown ass man because I did have to face down a mortgage, then beyond the discipline to wait longer, what I did with my money was my business. So I worked.
As for the model itself, sporting a 72-inch wingspan, I powered it with a 2nd hand Fox 59, which I'd bought for $15. Fifteen bucks seems cheap today for a good running engine - but - my inflation calculator says this was the equivalent of $120 today (2026 dollars). Anyway, because Schnuerle port engines had gotten big in the market as a consequence of making more horsepower (enough so to leave loop charged engines in the dust, power-wise), it meant the latter were relatively plentiful. And this translated to cheap enough for me to afford a .60-class engine versus a .40-class engine. An engine, which incidentally, brand new cost $39.99. As for the avionics, my model was controlled with a 5-channel Orbit radio.
Note; I still have that Fox engine 'and' because I recently found a NIB example of the Cardinal Squire kit on eBay, then some day I'm going to build it and see what I missed. I'm already pretty sure Bill was right a Falcon 56 would have gotten me going better, but I was already stubborn. Point being, I get to take another shot at building my first RC model airplane all over again . . . but now I've really digressed!
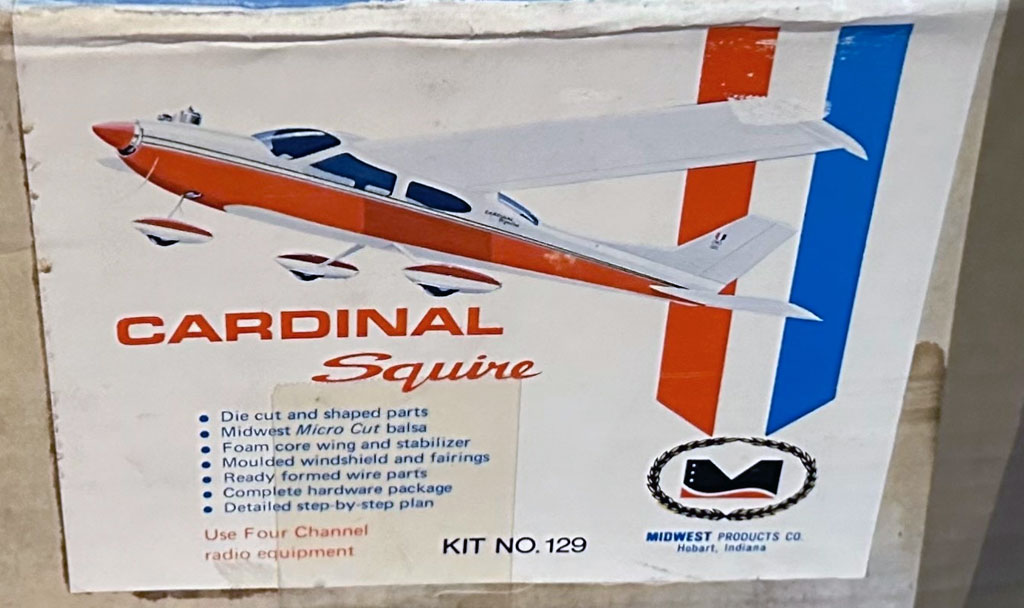
- eBay find, a NIB example of my 1st RC model airplane kit

Anyway, this next photo is of me crouched over that model. Only reason it exists is I didn't have a driver's license so my Mom drove me to the flying field for the maiden. This, on a bitterly cold day in February, 1973. That, and she had the foresight to buy Kodak carboard body disposable camera - thanks Mom!
Note; taken just before disaster . . . the model crashed after liftoff due to the aileron servo being reversed. My bad - sigh.
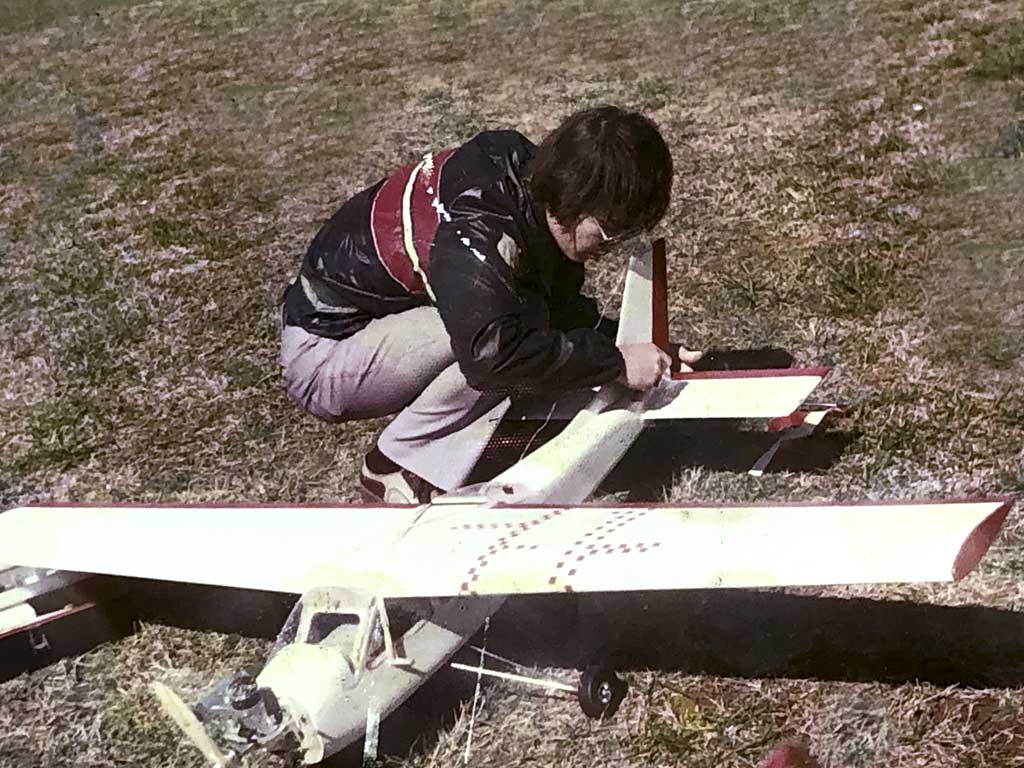
- John styling an Elvis haircut and two-tone shoes!
Major point of all this yammering? Simple, tyring to explain how coming up, I didn't know 'anybody' with more than one model airplane. Stayed that way through high school, college, and maybe twenty years into marriage! Why?
While I can only speak for myself, it was probably the same reason as for everybody else . . . because money was tight. Now fast forward ten, or so, years to this next photo (taken by my lovely bride in the early 1980s).
In this next photo I'm adjusting the needle valve of an HP .40 engine mounted to my 'one' model, a Sterling Fledgling. A Fledgling being essentially an aerobatic Falcon 56 and about as inexpensive as they came back in the day. Basic box, shoulder mounted 56-inch wing, 4-channels, and powered by a .40-class engine turning a 10x6 prop on 5% nitro fuel. By the way, this size model was about the most popular at any field in the country.
Note; by then my radio was a Kraft 7-channel (and yes, I still have it, too).

- John adjusting the needle valve of a Sterling Fledgling
Enter multi-model transmitters
So I've shared a progression of 20 years worth of models. Major point, one man, one model. Then the arrival of multi-model transmitters opened the flood gates to taking more than one model to the flying field. Basically, once you could add individual receivers to model-memory we were off to the races because until then, it was something of a big deal for anybody to have two model airplanes. Why? Just because of the sheer expense!
When breaking it down, it was not just the cost of another airplane and engine. If you scratch built and covered in silk you could build a model for less than $50 pretty easily. By then a used engine might be $25, but the second RF system was the back breaker. Anyway, RF stands for radio frequency, and 'system' refers to brands like Proline, EK Logictrol, and Kraft. And to put numbers to it, a $500 radio system back in 1982 amounted to ~$1500 today (at the time of this writing).
So fast forward another decade (1992), and it's now twenty years of me being into modeling. I'd gotten into helicopters, and now I'm flying a Futaba RF system. I also remember exactly when I purchased my first multi-model transmitter because I'd spent a year saving for a Futaba 7UHP, then another year to update to a 7UHPS, an upgrade to a near identical system. Once I had a buyer for the old one lined up, it meant I had the green light once I had my money right.
Anyway, the 7 referred to the number of channels. The U was the specific model type. The H meant helicopters vs A for aircraft (some differences in switch positions and whether the throttle stick had a ratchet detentes). The P meant PCM (pulse code modulation), and the 'S' meant Super. Only reason I upgraded from a 7UHP to a 7UHPS was expressly for the benefit of the killer 'Super-feature' of multi-model memory.
So where am I going with all this? Well, these days, another three decades later (now +50 years from when I got into the hobby), it's not unusual for someone to arrive at the field with more than one model. As for me, I suffer such an embarrassment of riches, I have more models I can conveniently fly! And if you think about it, this actually describes a first world problem . . . one I couldn't imagine, much less dream of, when I got my start!
Anyway, once I had two models, soon I had three. Enter the issue of storage. The point of this article!
Storage
So this brings us to the meat of this article, storing models. I'm going to share what I do in hopes there's a nugget of useful info for you. This, because I have so many models I now have to plan for how and where to store them! Anyway, while I can't speak for how others do things, I mostly store wings and fuselages separately.
And it's fuselages, due to the empennage, which are more trouble to store. It's this that what we're mostly going to discuss
Note; I also store models based on whether they're active and inactive. I generally store inactive models by suspending them from the ceiling.
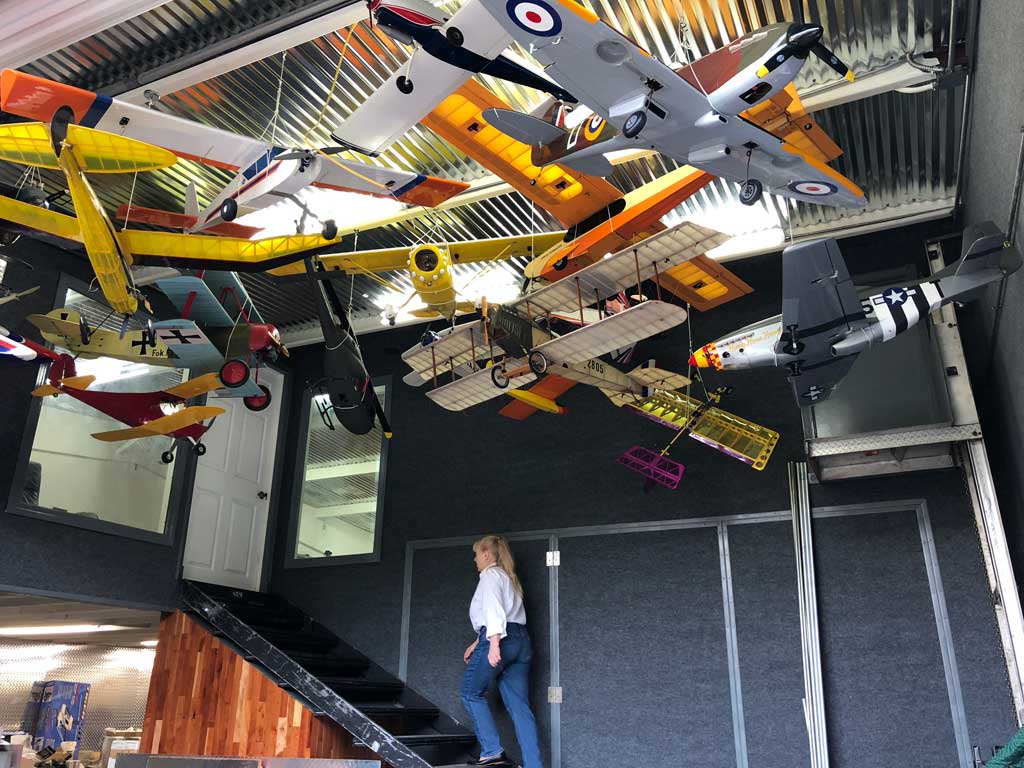
- Layers of inactive model airplanes look great suspended from a ceiling
Hanging
How to store models is basically a function of how much room you have. Less room, then fewer (or, smaller) models. And while some find it hard to believe, regardless of how large the available space . . . you still run out of room eventually. And 'this' is when you really begin to make more effective use of the available space.
Anyway, over the course of +50 years as an aircraft modeler, what has developed as best for me is storing fuselages on the wall, nose down. Reason nose down is this gets the tails out of the way! And by the way, in the above photo, no matter who they are, once they notice the models hanging from the ceiling they always pause to look around and smile whilst ohh-ing and ahh-ing. Then come the questions. I once yakked 20 minutes with a my UPS driver and these guys try hard not to waste time!
Note; in all honesty, this is an aspect of model ownership, pride, that brings a quiet joy. The joy accruing from yakking about my models.
In fact, if the pleasure of modeling where like a 3-legged stool, then one leg of pleasure is yakking about models, another is the charge resulting from executing a perfect maneuver, maybe like a slow roll, and these two pleasures are separate and distinct from the 3rd leg of the pleasure-stool, which may be completing some part of a build. For example, after hinging the last control surface.
Best of the three? Hard to say, but I really love running my mouth about model airplanes! Now let's discuss active models, the ones in the rotation.
the rotation
As regards active models, by this I mean are they in the 'rotation', e.g. models ready to be flown when it suits me. These are typically stored in and about the workshop within ready reach if they need charging before I go (so principally models with engines). However, I also stash models for repair in the workshop as well.
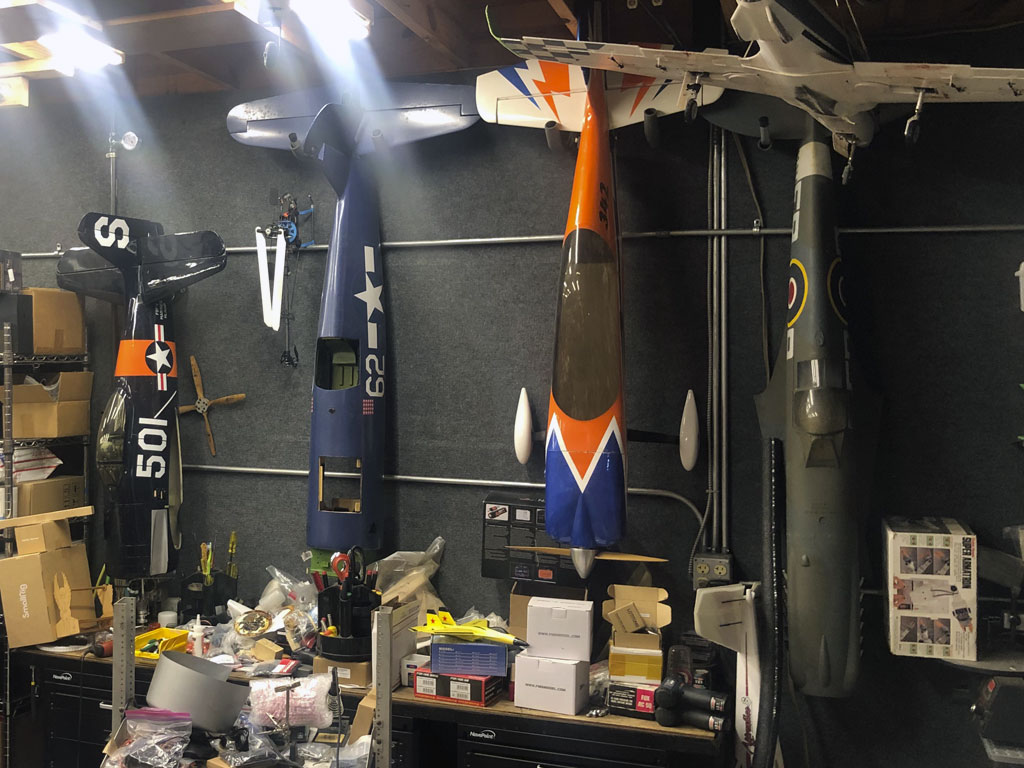
- Active models or ones for repair are conveniently within my workshop
But other models in the rotation, typically electric models which may not have a separate flight pack, these I often store near the entrance to my shop. Anyway, in this brief how-to we're going to delve into tips for storing fuselages by hanging from the wall.
Hooks and pegs
with a principle emphasis on using garden-center wall hooks to support them by the horizontal empennage.
In what follows; nowhere am I representing this is the best way to hang fuselages! Instead, it's what's evolved to work best for me. And it came about because it works for all sizes and classes of models . . . until it doesn't make sense. We'll also touch on 'when' hanging models by the stab was no longer a good idea for me, later.
So why yak about one method to store one part of a model airplane? Simple, it's being shared to help get the little gray cells stirring for if this method will work for 'your' rotation. Anyway, I favor using walls for storing the fuselages of active models. Where, and which wall is another matter.
While you may not believe it, there is some sense of order. For example, unless it's stored for repair, the nearer to the workshop, the more frequently it's being flown. Easier to charge,too.
But also the nearer the building exit, the more convenient. At least for one type of model. Point being, organization-wise, I also tend to stash fuselages of a type together. For example, in this next photo I've got smaller XA-type models (48-60-inch wingspan fuselages) hanging on a wall near the exit door of the building.
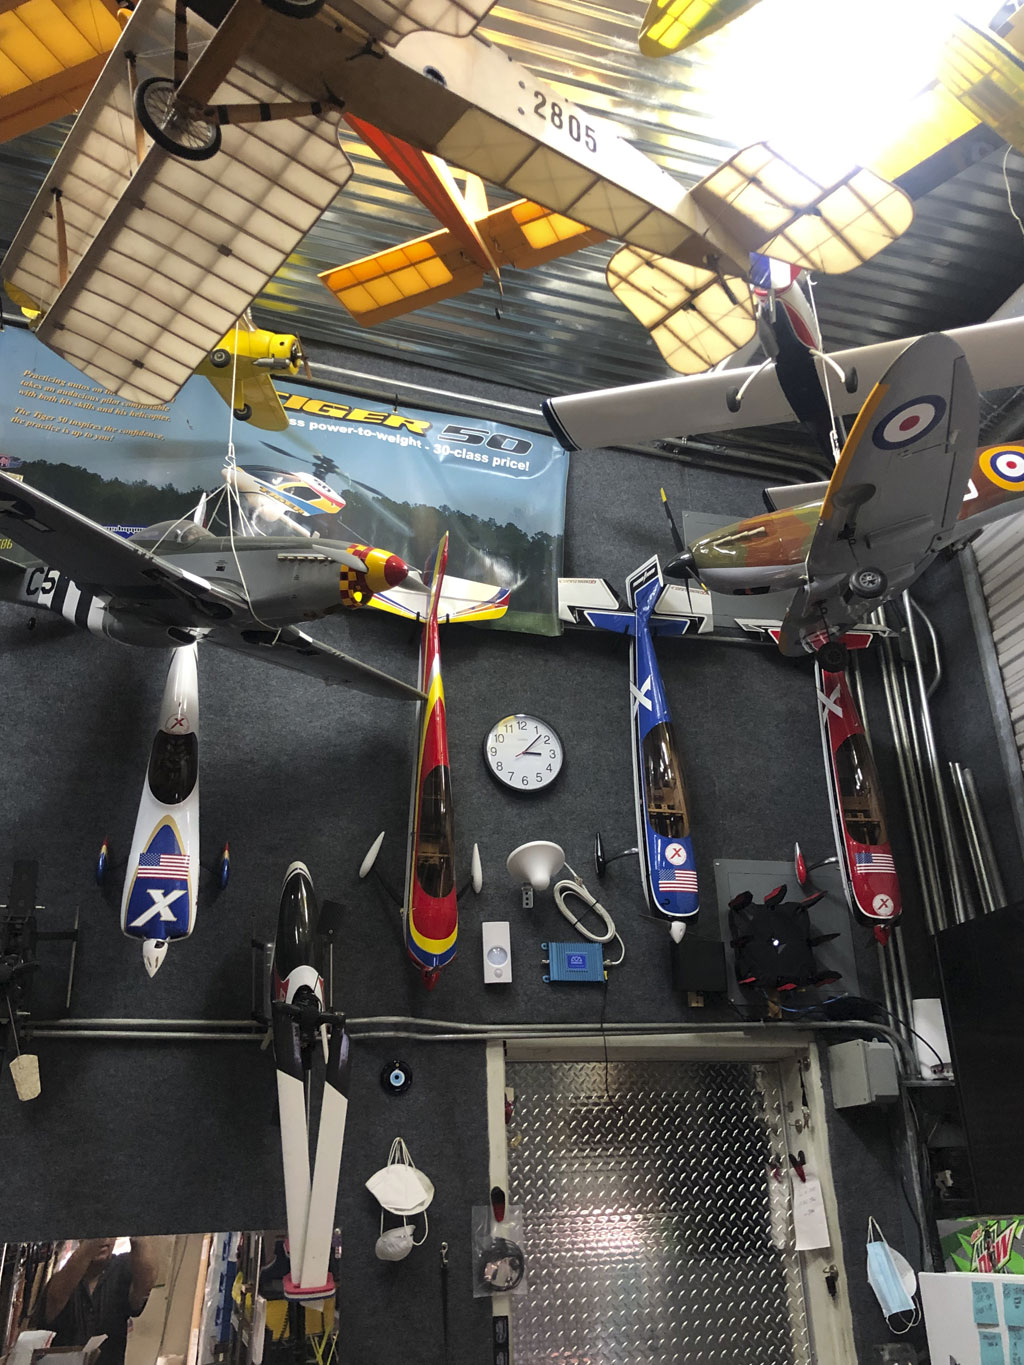
- Storing fuselages and helis together also works for me
As to why electric XA all together, in part being they're electric means they make no mess (fuel drips), and sans the battery, the fuselages are light and easy for me to put away, or take down.
Also, you may notice, I don't discriminate so I'll blend in active helicopters with fuselages, too . . . wherever they fit!
Storage hooks
So I especially like to use padded wall-hooks to stash fuselages in my workshop. I buy them at Lowe's where they're principally marketed as being for garden tools.
These specific hooks are made of 3/8' diameter thin-wall steel tubing painted in a gray hammer-finish and padded with foam and cost a few bucks. However, Ace Hardware, Home Depot, etc. will have similar. Or look on Amazon since in addition to the big guys, they make available less well known vendors.
Anyway, garden department hooks for tools doesn't involve rocket science. Everybody and their brother thinks their product is best. Point being, there are many alternatives to what I am using. Look around, you'll find something useful
Recapping, the principal reason I use hooks is so I can slip a fuselage into place placing the horizontal stab into the cradle of the arms and store it out of my way. Stabs up high don't interfere with things in my working envelope.

- Garden center-type wall hooks repurposed to store fuselages
What prompts this article
So the other day I purchased a gorgeous Nick Ziroli Stearman in 1/5th scale. It was the 3rd example built from the same set of plans by master craftsman John LaBell, of Ocala, FL . . . look at it, is this a beauty, or what?
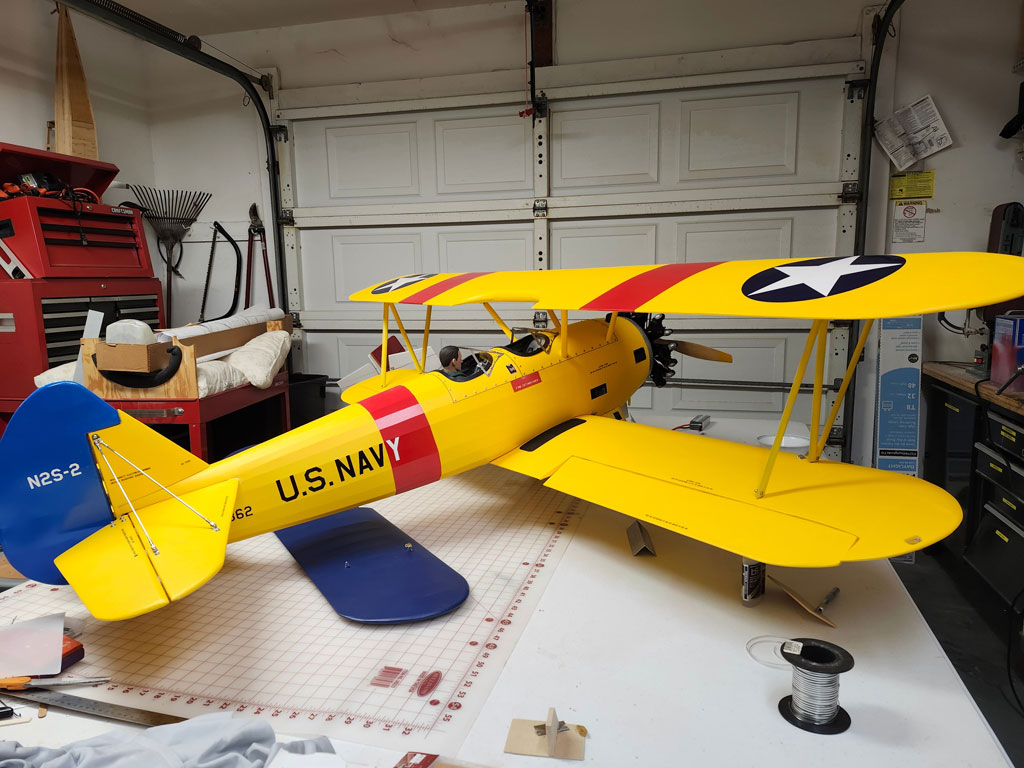
- Gorgeous example of the builder's art, a 1/5th scale Ziroli Stearman
Thing is, spanning 77-inches meant having it in the workshop fully assembled would be a nuisance. Proof being the garage door in the background. No, not huge by some standards - but - plenty good size, nevertheless. Fortunately, breaking it down makes the storage problem more manageable
Anyway, I brought it home and as is my wont, I sussed out a likely location for the fuselage and grabbed a new hook. Once I found a convenient open spot on the wall for its fuselage, I ran a screw through the topmost mounting hole.
Note; while they have a place for three mounting screws, I use just the one at the top because I'm going into plywood. If you're going into drywall, then you either have to hit a stud to pull off this trick of using just one screw, or you should use three drywall anchors. Use your judgement!
Anyway, after fiddling with the best position for the hook, I drove a screw home and hung the Stearman fuselage. Easy peasy. Moreover, after stepping back to admire how nicely it was flanked by the good company of a Top Flite 1/5th scale Fw-190, and a Flex Innovations Mamba 70, next, I turned my focus to other things. Basically, leaving the Stearman awaiting me to have the bandwidth to devote to readying it for flight.
Well, in the words of Lee Corso, the great sport football commentator and once coach of the Naval Academy . . . not so fast! Here's what went wrong. I offer it as a cautionary tale.
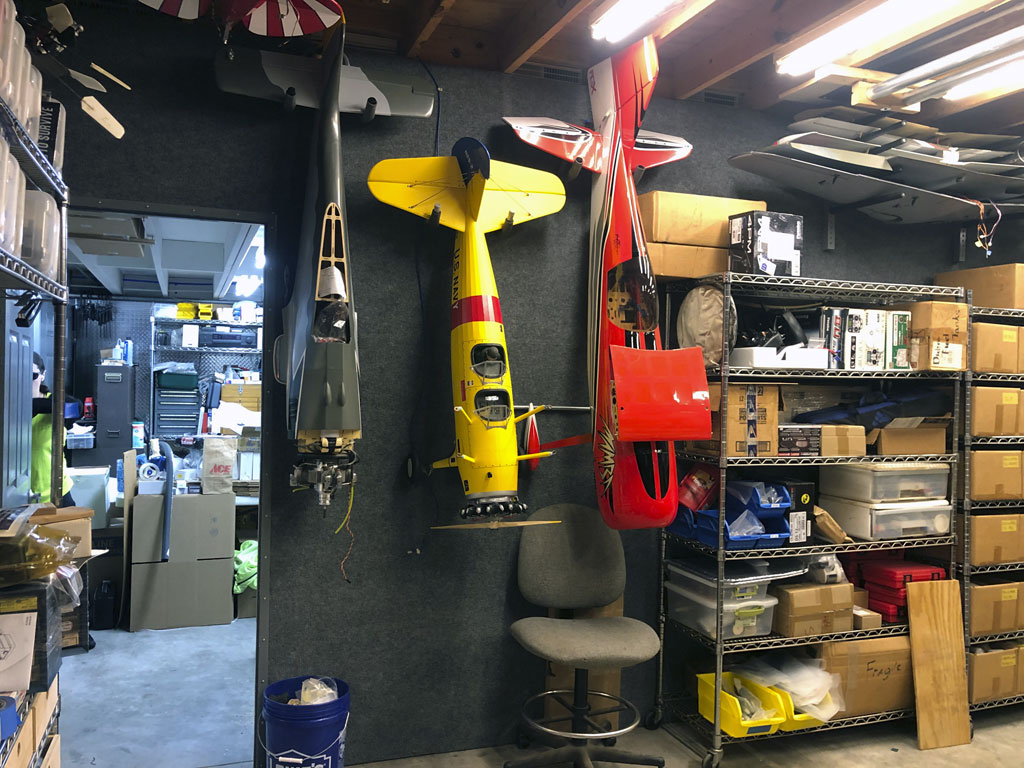
- Fuselages suspend by the horizontal stab on padded steel wall hooks
Fast forward a couple months
So a problem reared its head. And it's 100% my fault. You see, instead of first inspecting the stab-structure was strong enough to support the weight, I made the executive decison of assuming it was. Turns out I was mistaken,
The structure simple wasn't adequate for the load. In merely assumed it would work (as it has for many other models) I put myself in position of paying the stupid tax. Yes, as a consequence of my hubris, the mass of the model broke the lightly built stab leading edge in three places.
The stupid tax being the time and treasure to effect repairs. And thus proving, on the odd occasion, I can really be a doofus! So Im telling you not because misery may loves company, more like this is me being a mate and telling you about it by way of heads up.
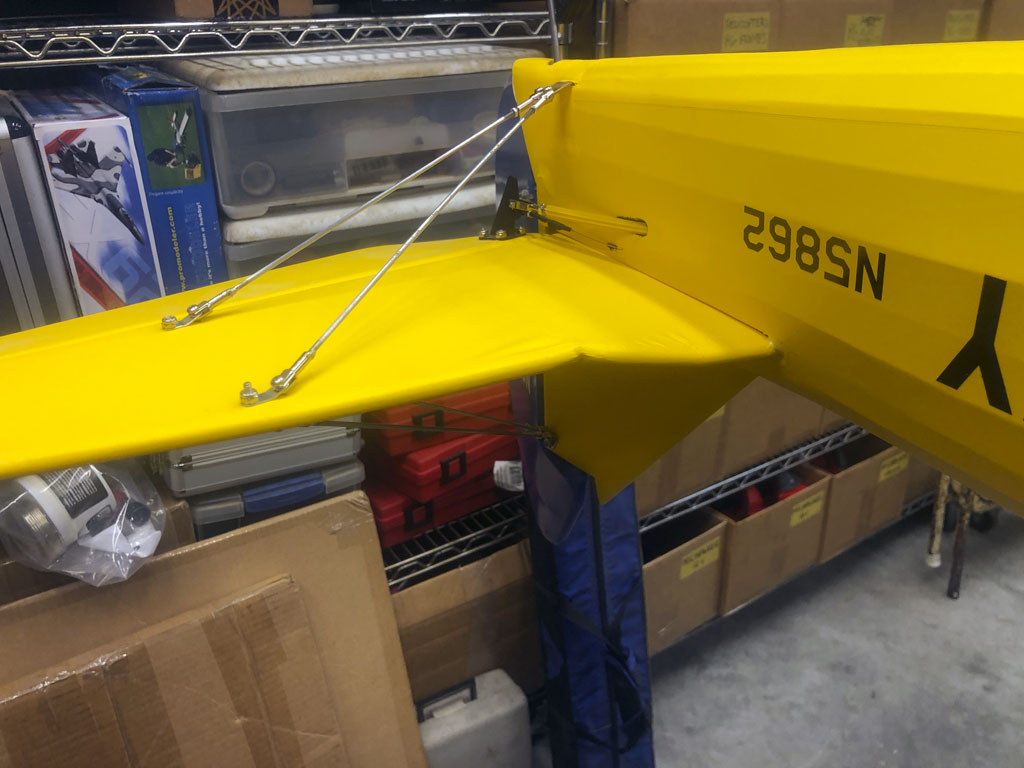
- Damaged leading edge - fractured in 3 places
Interestingly, the other side's leading edge was relatively undamaged. Yes, dented, but in comparison barely dented!
Note; port side dinged inboard of where it's supported by the support struts.
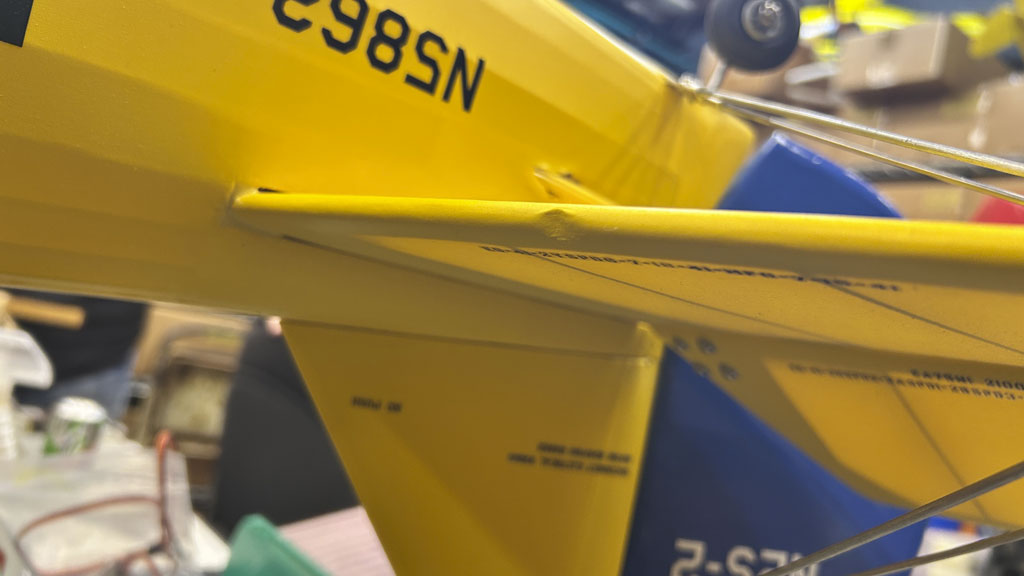
- Barely dented leading edge of the other side's stab
puffing
So it's my suspicion the dented balsa on this port side could posibly be injected with water. For those unaware, this is a technique for wood repair using the tiny needle meant for an insulin syringe.

- Tiny gauge needle used for dispensing insulin works great
Basically, after penetrating the covering and injecting the dented wood with water, hitting it with a hot MonoKote iron sees the water expand to create steam and presto, the dent instantly puffs out - thus, erasing it.
Of course, in fact, the wood fibers remain damaged. Thus, it's a judgement call on if this is done in an area that's cosmetic or structurally sound. Know this, it's my experience massaging said previously dented surface with the hot iron makes the damage indiscernible almost 100% of the time.
On repairing the damage
Before continuing with the repair, and in my defense, usually there's no issue with hanging a fuselage this way - but - recall these models tend to come comes out tail heavy. And Nick Ziroli is nobody's fool. Means he builds them to fly, not crash. Put another way, lightly built! Too lightly in this instance.
Note; it didn't fail immediately. Took a bit of time. Now clue how long but within a matter of weeks. Anyway, the stab leading edge failed and it was my fault for not confirming the structure was strong enough.
In this next photo the covering has been removed and the stab's leading edge has been replaced with a new piece of balsa.
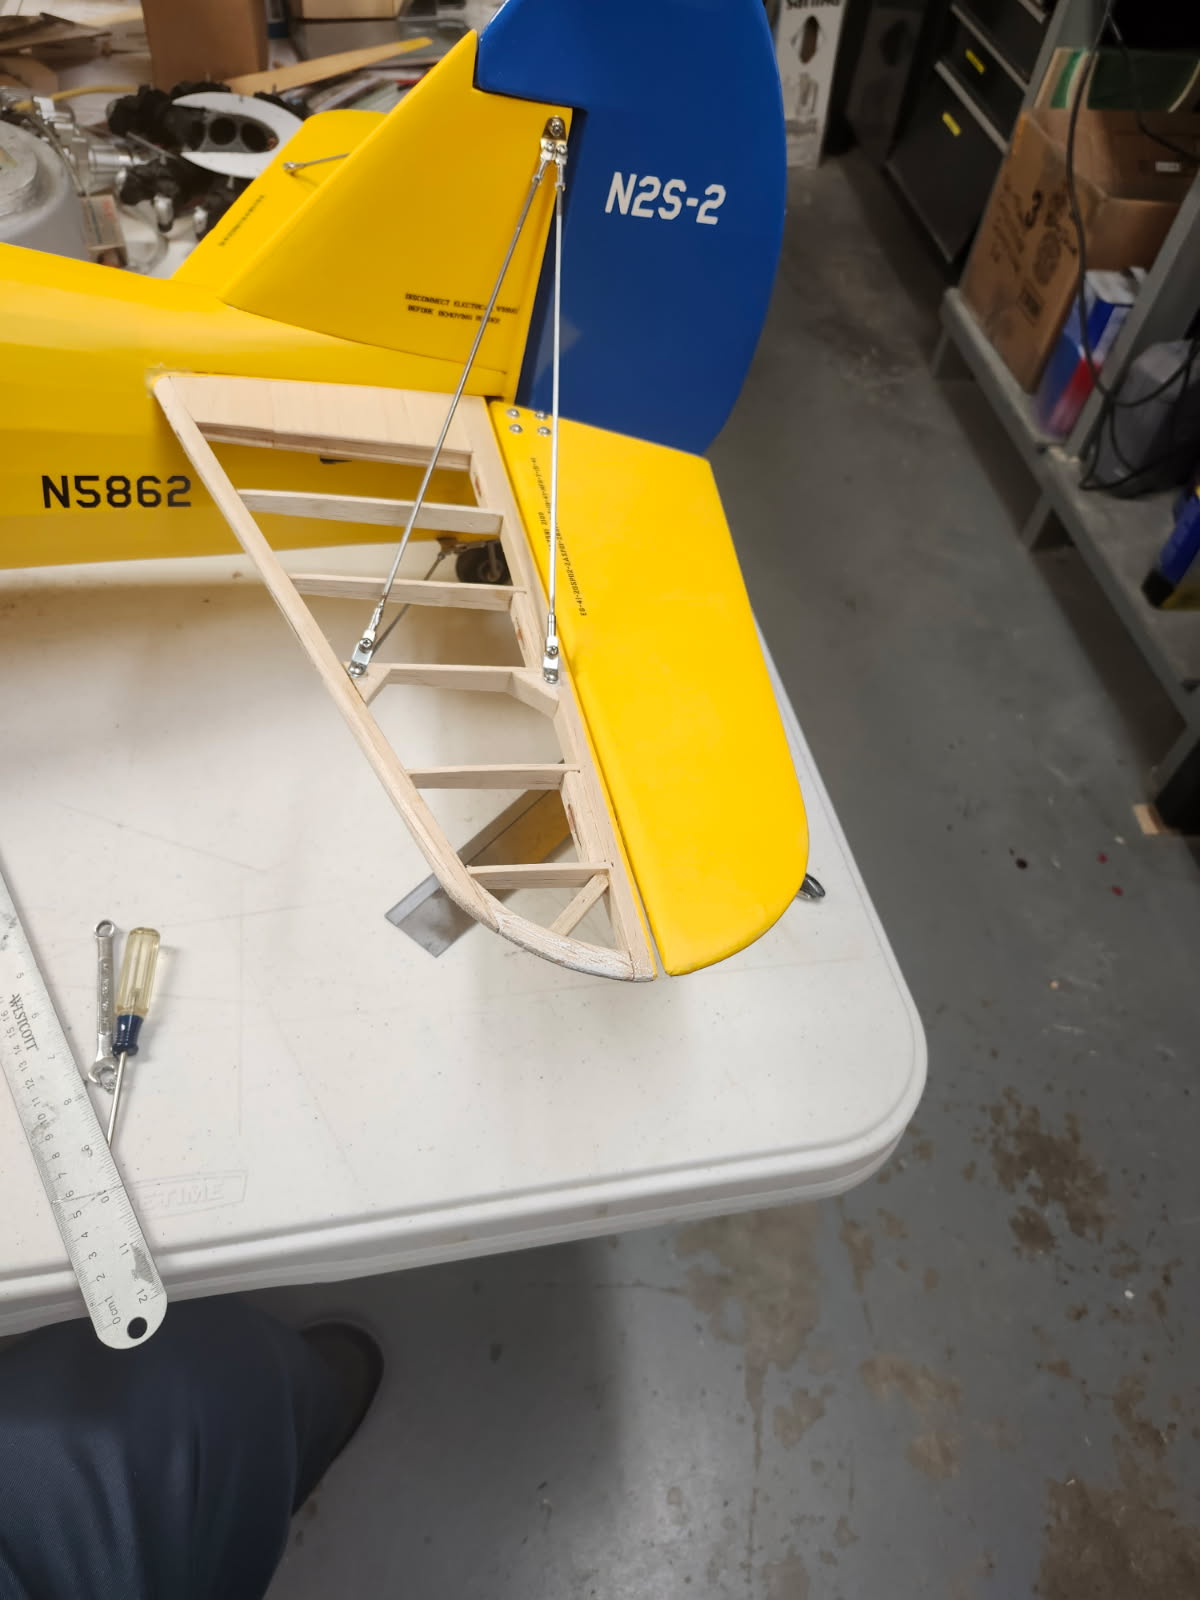
- Crushed stab leading edge replaced with new balsa
Anyway, while it's naked for repair, a spot of reinforcement was deemed a good idea. This through the judicious application of a bit of carbon fiber pultruded 5mm tube (1mm wall). Stout stuff, weighs but a couple grams.
In this photo, it's already embedded in the leading edge with epoxy and merely awaits a bit of Stits SuperFil.
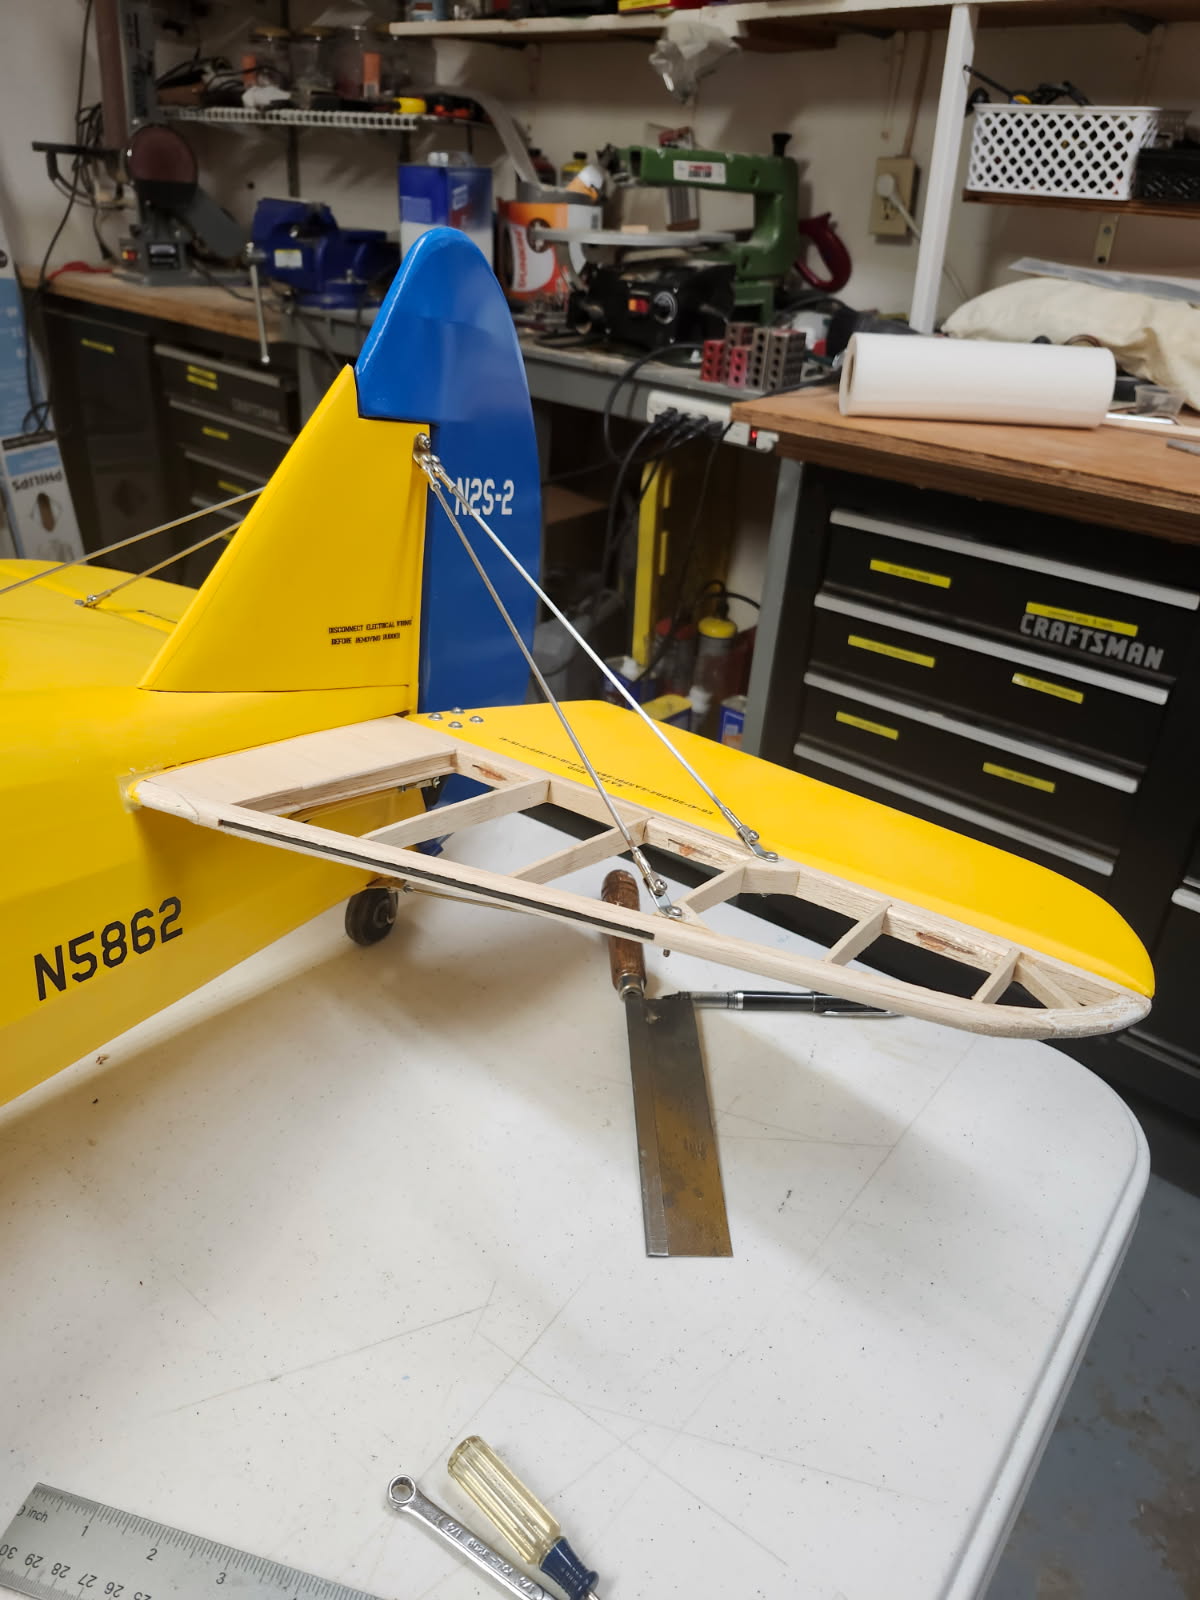
- 5mm pultruded carbon fiber rod as reinforcement
Then here's the other side already filled with SuperFil and sanded smooth ready for covering. Note the added gusseting to help better spread the load.
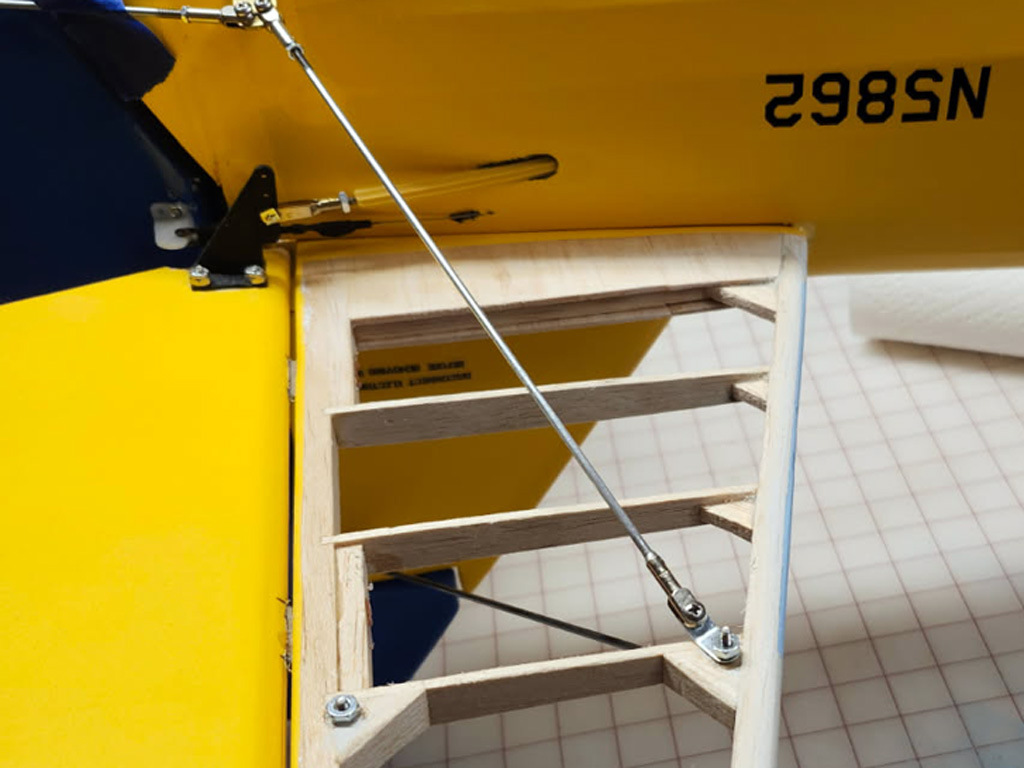
- Gussets add enormously to the strength with little weight
And if you're wondering, cutting back the Oratex almost to the hinge line allows for the stab to be re-covered without much in the way of drama.
Note; leaving the steel guy rods in place ensured the alignment of the stab remained perfect during the repair.
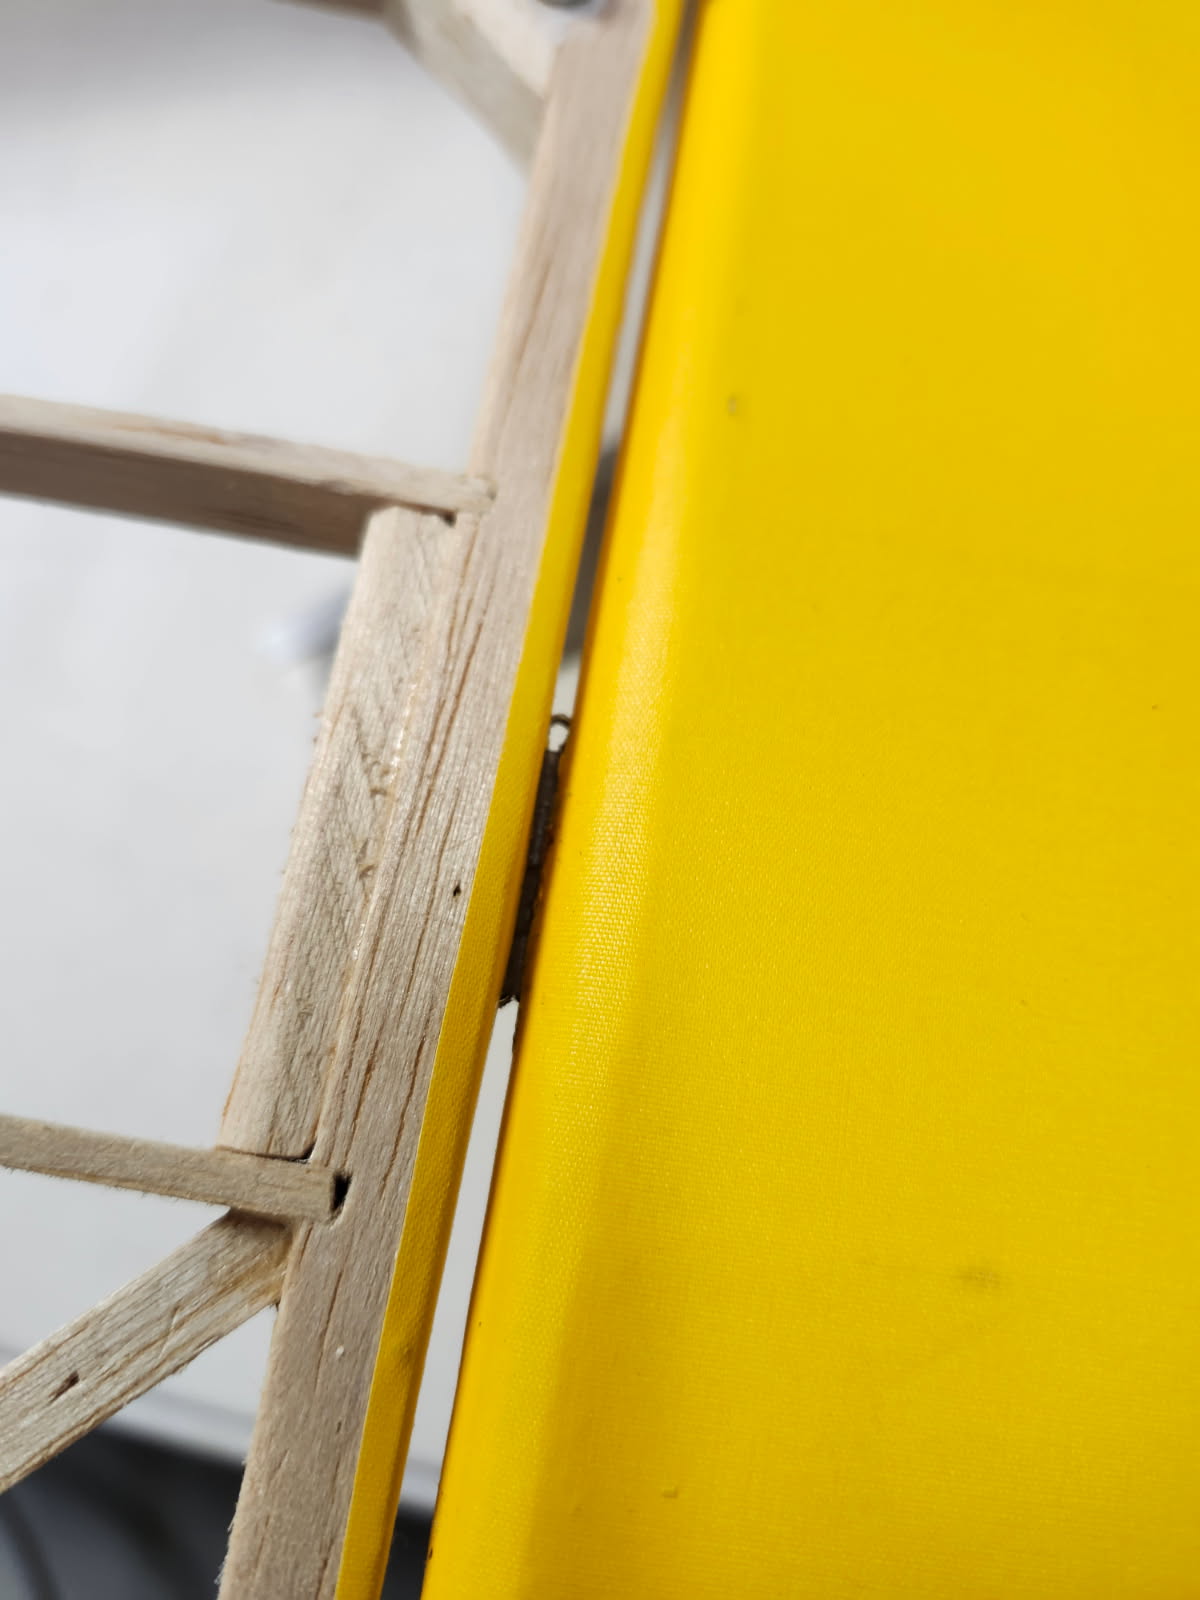
- Covering material left near the hinge line
And it's a wrap, new yellow Oracover painted fabric shrunk in place and it's like it never happened!

- Horizontal stabs ready for flight once again
Summary
Floor space in my shop is so precious I resort to suspending models (both assembled as well as in components parts) from ceilings and walls. Hanging the fuselages of active models (and ones for repair) on walls by the empennage has turned out to be the best method for me. I find it a it's a good method for models ranging from 48-inch wingspan to ones considerably larger. However, the downside is the stab structure must be strong enough to support the model without damage.
The genesis for this article was me being stupid and damaging a model. Instead of just repairing it and moving on, aka hiding my tracks, it became a teaching moment. So showing the results of trying this method when the structure wasn't up to the job, to include the amount of trouble it to took to make the repair (what I refer to as the stupid tax because I could have been more careful) is shared to show what the stakes of being wrong may cost. Saying hanging by the empennage is great until it isn't, so use your judgement!
Anyway, storage is the subject of endless fascination. Besides hanging fuselages, I also suspend assembled models (and in one case, just a fuselage) form the ceiling. I also use a method I learned for storing wing panels on walls - again to preserve floor space. These are all subjects of other articles.
And by way of preview, this model posed something of a challenge to store!

- Too long for a standard wall when stood on it's nose


